|
Pre-Installation tasks
of Installing Oracle 11g Real Application Cluster (RAC)
(11.1.0.6) 32-bit on
CentOS
4 Update 5 X86
By Bhavin Hingu
|
Pre-Installation
Task:
Task
List:
Required
Hardware:
To
create 2-node RAC using NAS (iSCSI base nfs), one would require 3
machines with the following
hardware installed on it.
Per
Node:
1 GB RAM, at least 8 GB of harddrive, 1 GHz CPU,
3 Network Interfaces: 1 for Public, 1 for Private, Cluster
interconnect and 1 for storage network
Per
Cluster:
1 Storage Server hosting Storage Operating System
1 Network HUB
(Public)
1
Network HUB (Private -- cluster interconnet)
1
Network HUB (Private -- Storage Server)
2 network cables for
Public network
(eth0)
2
network cables for
private network
for internode communication (eth1)
3 network cables for
private network
for storage Network (eth2)
I
used the below hardware to build 2-node RAC cluster for this excercise.
RAC Node1
|
Dell Intel PIII 1.3 GHz, 256 MB RAM, 20 GB HD |
$200 - Used one
|
| RAC Node2 |
Dell Intel PIII 1.3
GHz, 256 MB RAM, 20 GB HD |
$200 - Used one |
Upgrade Memory to 512MB on RAC Nodes
|
256 MB x 2 for Both the Server |
$110 |
NFS Storage Server -- IP BASED iSCSI SAN
|
AMD athelon, 1.2 GHz, 1GB RAM, 60GB HD
|
$300 -- Used one
|
USB External HD
|
500GC USB MyBook WD harddrive
|
$180
|
Added 2 extra NICs on Each RAC nodes
|
D-Link Ethernet card x 4
|
$30 X 4
|
Network Hub
|
"NETWORK Everywhere"10/100
5-Port Hub
|
$30 X 3
|
| Ethernet cable |
|
$15 X 7
|
Total Cost : $1305.00
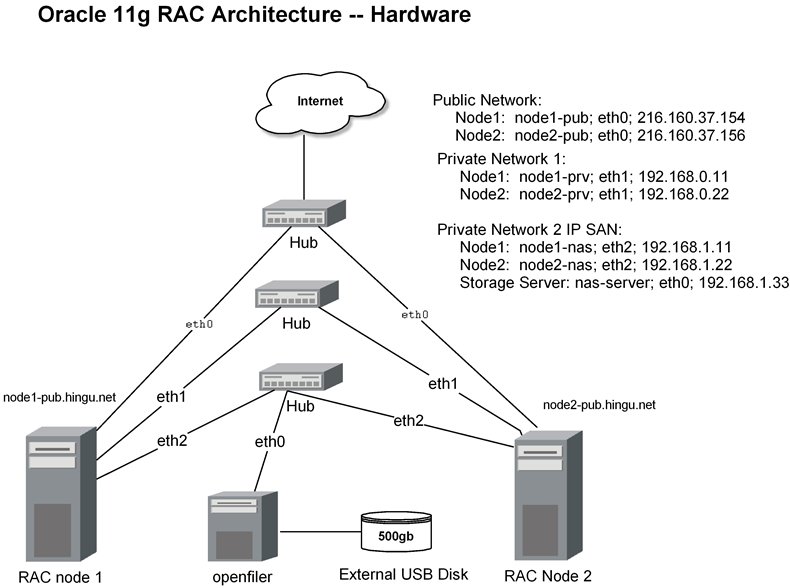
Technical
Architecture of 2 node RAC:
Public Name:
node1-pub.hingu.net,
node2-pub.hingu.net
Private Name:
node1-prv, node2-prv
Virtual Name:
node1-vip, node2-vip
Operating System: CentOS
Linux 4 Update 5 (2.6.9.4-55-EL)
ORACLE_BASE: /u01/app/oracle
ASM_BASE: /u01/app/asm
CRS_BASE: /u01/app/crs
CRS file Location:
/u02/ocfs2 mounted on /dev/sda1 (ocfs)
Storage Server: nas-storage:
Openfiler
-- based on Linux kernel 2.6.9
Oracle 11g R1 on CentOS EL 4 Update 5 requires below extra packages to
be
installed with the version same or higher than listed below.
binutils-2.15.92.0.2-18
compat-libstdc++-33.2.3-47.3
elfutils-libelf-0.97-5
elfutils-libelf-devel-0.97.5
glibc-2.3.9.4-2.19
glibc-common-2.3.9.4-2.19
glibc-devel-2.3.9.4-2.19
gcc-3.4.5-2
gcc-c++-3.4.5-2
libaio-devel-0.3.105-2
libaio-0.3.105-2
libgcc-3.4.5
libstdc++-3.4.5-2
libstdc++-devel-3.4.5-2
make-3.80-5
sysstat-5.0.5
unixODBC-2.2.11
unixODBC-devel-2.2.11
iscsi-initiator-utils-4.0.3.0-5
<-- For iscsi based SAN configuration
- Please execute the below command as root to make sure that
you
have this rpms installed. If not installed, then download and install
-
using YUM.
rpm
-q binutils elfutils-libelf elfutils-libelf-devel glibc glibc-common
glibc-devel \
gcc gcc-c++ libaio libaio-devel libgcc libstdc++ libstdc++-devel make \
compat-libstdc++ sysstat unixODBC unixODBC-devel iscsi-initiator-utils
I had to install the below
extra rpms:
[root@node1-pub
~]# yum
install libaio libaio-devel elfutils-libelf-devel unixODBC
unixODBC-devel
Configuring
Public
and Private network for the Cluster Nodes:
Each node in the
cluster must have 3 network adapter (eth0, eth1and eth2) one for the
public, second one for the private
network interface (internode communication, interconnect) and third one
for the Network Storage System (Private). You make
sure that if you configure eth1 as the private interface for node1
then, eth1 must be configured as
private interface
for the node2.
Follow the below steps to configre these networks:
(1) Change the hostname
value by
executing the below command:
For Node node1-pub:
[root@localhost
~]# hostname
node1-pub.hingu.net
For Node node2-pub:
[root@localhost
~]# hostname
node2-pub.hingu.net
For
Storage Server:
[root@localhost
~]# hostname
nas-server
(2) Edit the
/etc/hosts file as shown below:
[root@node2-pub
~]# cat /etc/hosts
# Do not remove the following line, or various programs
# that require network functionality will fail.
127.0.0.1
localhost.localdomain localhost
## Public Node names
216.160.37.154
node1-pub.hingu.net node1-pub
216.160.37.156
node2-pub.hingu.net node2-pub
## Private Network (Interconnect)
192.168.0.11
node1-prv
node1-prv
192.168.0.22
node2-prv
node2-prv
## Private Network (Network storage)
192.168.1.11
node1-nas
node1-nas
192.168.1.22
node2-nas
node2-nas
192.168.1.33
nas-server
nas-server
## Virtual IPs
216.160.37.153
node1-vip.hingu.net node1-vip
216.160.37.157
node2-vip.hingu.net node2-vip
(3) Edit OR create
the
/etc/sysconfig/network-scripts/ifcfg-eth0 as shown below:
create the same file on both
the nodes as shown below.
[root@node2-pub ~]# cat
/etc/sysconfig/network-scripts/ifcfg-eth0
DEVICE=eth0
BOOTPROTO=none
IPADDR=216.160.37.154 <-- For Node 1
IPADDR=216.160.37.156 <--
For Node 2
HWADDR=00:06:5B:AE:AE:7F
ONBOOT=yes
TYPE=Ethernet
[root@node2-pub ~]#
(4) Edit OR create
the
/etc/sysconfig/network-scripts/ifcfg-eth1 as shown below: -<-- For
Cluster interconnects
For Node node1-pub:
[root@node1-pub ~]# cat
/etc/sysconfig/network-scripts/ifcfg-eth1
DEVICE=eth1
BOOTPROTO=static
HWADDR=00:13:46:6A:FC:6D
ONBOOT=yes
IPADDR=192.168.0.11
NETMASK=255.255.255.0
TYPE=Ethernet
[root@node1-pub ~]#
For Node node2-pub:
[root@node2-pub ~]# cat
/etc/sysconfig/network-scripts/ifcfg-eth1
DEVICE=eth1
BOOTPROTO=static
HWADDR=00:13:46:6A:FC:6D
ONBOOT=yes
IPADDR=192.168.0.22
NETMASK=255.255.255.0
TYPE=Ethernet
[root@node2-pub ~]#
(5) Edit OR create
the
/etc/sysconfig/network-scripts/ifcfg-eth2 on RAC Nodes as shown below:
<-- For
iSCSI SAN Storage Network
For Node node1-pub:
[root@node1-pub ~]# cat
/etc/sysconfig/network-scripts/ifcfg-eth2
# ADMtek NC100 Network Everywhere Fast Ethernet 10/100
DEVICE=eth2
ONBOOT=yes
BOOTPROTO=static
IPADDR=192.168.1.11
NETMASK=255.255.255.0
HWADDR=00:18:F8:0F:0D:C1
[root@node2-pub ~]#
For Node node2-pub:
[root@node2-pub ~]# cat
/etc/sysconfig/network-scripts/ifcfg-eth2
# ADMtek NC100 Network Everywhere
Fast Ethernet 10/100
DEVICE=eth2
ONBOOT=yes
BOOTPROTO=static
IPADDR=192.168.1.22
NETMASK=255.255.255.0
HWADDR=00:18:F8:0F:0D:C1
[root@node2-pub ~]#
Edit OR
create the
/etc/sysconfig/network-scripts/ifcfg-eth0 on SAN/NAS Storage Server:
[root@nas-server ~]# cat
/etc/sysconfig/network-scripts/ifcfg-eth0
DEVICE=eth0
BOOTPROTO=dhcp
HWADDR=00:80:AD:41:8C:1D
ONBOOT=yes
TYPE=Ethernet
[root@nas-server
~]#
(6) Edit the
/etc/sysconfig/network
file with the below contents:
For Node node1-pub:
[root@node1-pub
~]# cat /etc/sysconfig/network
NETWORKING=yes
HOSTNAME=node1-pub.hingu.net
For Node
node2-pub:
[root@node2-pub
~]# cat /etc/sysconfig/network
NETWORKING=yes
HOSTNAME=node2-pub.hingu.net
(7) Restart
the network service OR reboot the nodes:
After I rebooted both the nodes, I
varified the network interface configurations by running the ifconfig
command as shown below.
[root@node2-pub ~]# ifconfig -a
eth0
Link encap:Ethernet HWaddr
00:06:5B:AE:AE:7F
inet
addr:216.160.37.156 Bcast:216.160.37.159
Mask:255.255.255.248
inet6 addr:
fe80::206:5bff:feae:ae7f/64 Scope:Link
UP BROADCAST
RUNNING MULTICAST MTU:1500 Metric:1
RX packets:24093
errors:0 dropped:0 overruns:0 frame:0
TX packets:8506
errors:0 dropped:0 overruns:0 carrier:0
collisions:0
txqueuelen:1000
RX bytes:4694668
(4.4 MiB) TX bytes:761581 (743.7 KiB)
Interrupt:11
Base address:0xe480
eth1
Link encap:Ethernet HWaddr
00:13:46:6A:FC:6D
inet
addr:192.168.0.22 Bcast:192.168.0.255 Mask:255.255.255.0
inet6 addr:
fe80::213:46ff:fe6a:fc6d/64 Scope:Link
UP BROADCAST
RUNNING MULTICAST MTU:1500 Metric:1
RX packets:150
errors:0 dropped:0 overruns:0 frame:0
TX packets:1355
errors:0 dropped:0 overruns:0 carrier:0
collisions:0
txqueuelen:1000
RX bytes:9000
(8.7 KiB) TX bytes:57078 (55.7 KiB)
Interrupt:10
Base address:0x6800
eth2
Link encap:Ethernet HWaddr
00:18:F8:0F:0D:C1
inet
addr:192.168.1.22 Bcast:192.168.1.255 Mask:255.255.255.0
inet6 addr:
fe80::218:f8ff:fe0f:dc1/64 Scope:Link
UP BROADCAST
RUNNING MULTICAST MTU:1500 Metric:1
RX packets:32249
errors:0 dropped:0 overruns:0 frame:0
TX packets:64333
errors:0 dropped:0 overruns:0 carrier:0
collisions:0
txqueuelen:1000
RX bytes:3682359
(3.5 MiB) TX bytes:5795687 (5.5 MiB)
Interrupt:9 Base
address:0x6c00
lo
Link encap:Local
Loopback
inet
addr:127.0.0.1 Mask:255.0.0.0
inet6 addr:
::1/128 Scope:Host
UP LOOPBACK
RUNNING MTU:16436 Metric:1
RX packets:6354
errors:0 dropped:0 overruns:0 frame:0
TX packets:6354
errors:0 dropped:0 overruns:0 carrier:0
collisions:0
txqueuelen:0
RX bytes:8304597
(7.9 MiB) TX bytes:8304597 (7.9 MiB)
sit0
Link encap:IPv6-in-IPv4
NOARP
MTU:1480 Metric:1
RX packets:0
errors:0 dropped:0 overruns:0 frame:0
TX packets:0
errors:0 dropped:0 overruns:0 carrier:0
collisions:0
txqueuelen:0
RX bytes:0 (0.0
b) TX bytes:0 (0.0 b)
[root@node2-pub ~]#
Downloading
Oracle 11g Software:
Download the
Oracle 11g R1 from here.
Memory
and swap Space:
Oracle 10g RAC requires to have 1GB of RAM available on each
node to sucessfully install 11g RAC. Well, I have
managed to install it with 512 MB RAM. You will get warning
during checking of pre-requise step of installation
step which you can ignore. Please goto Adding
an Extra Swapspace if you want to have an extra swapspace added.
Kernel
Parameters:
Oracle
recommends that you set shared memory segment attributes as well as
semaphores to the following values.
If not set, database instance creation will fail. I added the following
lines to /etc/sysctl.conf file. Every OS process needs
semaphore where It waits on for the resources. For more on semaphore,
please read the UNIX os documents.
Oracle 10g RAC requires
to have 1GB of RAM available on each node to sucessfully install 11g
RAC. Well, I have
managed to install it with 512 MB RAM. You will get warning during
checking of pre-requise step of installation
step which you can ignore. Please goto Adding an Extra Swapspace if you
want to have an extra swapspace added.
NOTE:
If the current value for any parameter is higher than the value listed
in this table, then do not change
the value of that parameter.
To see the
current setting in the kernel, please use the below command.
-
/sbin/sysctl
-a
| grep sem -- for semmsl, semmns, semopm, semmni
/sbin/sysctl
-a
| grep shm -- for shmall, shmmax,
shmmni
/sbin/sysctl -a | grep file-max
/sbin/sysctl
-a
| grep ip_local_port_range
/sbin/sysctl
-a
| grep rmem_default
Please add/change the appropriate
variables value in the /etc/sysctl.conf file as shown below.
-
[root@node2-pub
~]# cat /etc/sysctl.conf
# Kernel sysctl configuration file for Red Hat Linux
#
# For binary values, 0 is disabled, 1 is enabled. See sysctl(8)
and
# sysctl.conf(5) for more details.
# Controls IP packet forwarding
net.ipv4.ip_forward = 0
# Controls source route verification
net.ipv4.conf.default.rp_filter = 1
# Do not accept source routing
net.ipv4.conf.default.accept_source_route = 0
# Controls the System Request debugging functionality of the kernel
kernel.sysrq = 0
# Controls whether core dumps will append the PID to the core filename.
# Useful for debugging multi-threaded applications.
kernel.core_uses_pid = 1
# Extra parameters For 11g RAC installation
kernel.shmmax = 2147483648
kernel.shmmni = 4096
kernel.shmall = 2097152
kernel.sem = 250 32000 100 128
fs.file-max = 6553600
net.ipv4.ip_local_port_range = 1024 65000
net.core.rmem_default = 4194304
net.core.wmem_default = 262144
net.core.wmem_max= 262144
net.core.rmem_max = 4194304
[root@node2-pub ~]#
After adding these lines to
/etc/sysctl.conf, please run the
below command as root to make them enabled.
- [root@node2-pub
~]#
sysctl -p
Creating
oracle OS User
Account:
- groupadd
-g 900 dba
- groupadd -g 901 oinstall
useradd -u 900 -g oinstall -G dba oracle
passwd oracle
Plesae
verify that oracle user has
same gid and uid on all the RAC nodes by executing the this command
[oracle@node2-pub ~]$ id
uid=900(oracle) gid=901(oinstall)
groups=901(oinstall),900(dba)
[oracle@node1-pub ~]$ id
uid=900(oracle) gid=901(oinstall)
groups=901(oinstall),900(dba)
Creating
Oracle
Software Directories:
As
per OFA, oracle base directory has the path:
/mount_point/app/oracle_sw_owner where,
mount_point
is
the mount point directory for the file system that will contain the
Oracle software. I have used
/u01
for the mount point
directory. However, you could choose
another mount point directory,
such as /oracle
or /opt/oracle.
oracle_sw_owner
is the operating system user name of the Oracle software owner, for
example oracle.
Perform the below steps on all the
nodes in cluster.
[root@node2-pub
~]#
mkdir -p
/u01/app/crs
[root@node2-pub
~]#
mkdir -p
/u01/app/asm
[root@node2-pub
~]#
mkdir -p
/u01/app/oracle
[root@node2-pub
~]#
mkdir -p
/u02/ocfs2
[root@node2-pub
root]#
chown -R oracle:oinstall /u01
[root@node2-pub
root]#
chown -R oracle:oinstall /u02
[root@node2-pub
root]#
chmod -R 775 /u01/app/oracle
[root@node2-pub
root]#
chmod -R 775 /u01
Setting
Shell
Limits
for the Oracle User:
To
improve the performance of the software on
Linux systems, you must increase the following shell limits
for the oracle user:
Add the following
lines to the
/etc/security/limits.conf file:
oracle soft nproc 2047
oracle hard
nproc 16384
oracle soft
nofile 1024
oracle hard
nofile 65536
Add
or edit the following line in
the /etc/pam.d/login file, if it does not already exist:
session
required
/lib/security/pam_limits.so
For
the Bourne, Bash, or Korn shell, add the following lines to the
/etc/profile:
if [ $USER = "oracle" ]; then
if [ $SHELL = "/bin/ksh" ]; then
ulimit -p 16384
ulimit -n 65536
else
ulimit -u 16384 -n 65536
fi
fi
For the C shell (csh or tcsh), add
the following lines to the /etc/csh.login.
if ( $USER == "oracle" ) then
limit maxproc 16384
limit
descriptors 65536
endif
Enable
SSH
oracle
user Equivalency on Both the Cluster Nodes:
To
configure SSH user equivalency,
you must create
RSA and DSA keys on each cluster node and copy these keys
from all the
cluster node members into an authorised key file on each node. Follow
the below
steps to achieve this task.
su
- oracle
mkdir ~/.ssh
chmod 700 ~/.ssh
(A)
Generate the RSA and DSA keys on
Each NODE:
/usr/bin/ssh-keygen
-t rsa
/usr/bin/ssh-keygen -t dsa
(B)
on node1-pub:
Add keys to the
authorised key
file and then send the same file to every nodes in cluster:
touch
~/.ssh/authorized_keys
cd ~/.ssh
(1)
ssh node1-pub cat
/home/oracle/.ssh/id_rsa.pub >> authorized_keys
ssh node1-pub cat /home/oracle/.ssh/id_dsa.pub >>
authorized_keys
ssh node2-pub cat /home/oracle/.ssh/id_rsa.pub >>
authorized_keys
ssh node2-pub cat /home/oracle/.ssh/id_dsa.pub
>> authorized_keys
(2)
[oracle@node1-pub .ssh]$ scp
authorized_keys node2-pub:/home/oracle/.ssh/
(C)
ON Node2-pub:
(1)
ssh node1-pub cat
/home/oracle/.ssh/id_rsa.pub >> authorized_keys
ssh node1-pub cat /home/oracle/.ssh/id_dsa.pub >>
authorized_keys
ssh node2-pub cat /home/oracle/.ssh/id_rsa.pub >>
authorized_keys
ssh node2-pub cat /home/oracle/.ssh/id_dsa.pub
>> authorized_keys
(2)
[oracle@node2-pub .ssh]$ scp
authorized_keys node1-pub:/home/oracle/.ssh/
(D) Change the Permission of
authorized_Keys file (on each node)
[oracle@node2-pub .ssh]$ chmod
600 ~/.ssh/authorized_keys
During
executing step B - (1), you may be prompted as show below. Enter "yes"
and continue.
[oracle@node2-pub .ssh]$ ssh node1-pub cat /home/oracle/.ssh/id_rsa.pub
>> authorized_keys
The authenticity of host
'node1-pub (216.160.37.154)' can't be
established.
RSA key fingerprint is
<**********>.
Are you sure you want to
continue connecting (yes/no)? yes
Warning: Permanently added
'node1-pub,216.160.37.154' (RSA) to the list
of known hosts.
Warning: No xauth data; using
fake authentication data for X11
forwarding.
Now,
try executing the date (or any
other command) on remote node to make sure that oracle is not asked for
the password.
Do
the same on both the nodes in cluster. You should not recieve any
error message while you execute these commands on
all
the nodes. If you get any error, first fix them before you go
further.
[oracle@node2-pub
oracle]$ ssh
node1-prv date
Thu Sep 20 21:16:56 CDT 2007
[oracle@node2-pub oracle]$ ssh
node2-prv date
Thu Sep 20 21:17:03 CDT 20075
[oracle@node2-pub oracle]$ ssh
node1-pub date
Thu Sep 20 21:17:09 CDT 2007
[oracle@node2-pub oracle]$ ssh
node2-pub date
Thu Sep 20 21:17:19 CDT 2007
Errors / Warnings
during the network configurations:
I got the below warning when I
tried below command.
[oracle@node2-pub .ssh]$ ssh
node1-pub date
Warning: No xauth data; using fake
authentication data for X11 forwarding.
Thu Sep 20 20:43:39 CDT 2007
To
fix the above warning, create the /home/oracle/.ssh/config file (logged
in as oracle user) and make the below entry
in it. then run the same command again and the above warning would not
show up.
[oracle@node2-pub oracle]$ cat
.ssh/config
Host *
Forwardx11 no
You
may be promted
to enter 'yes' or 'no' for the first time performing ssh commands.
Simply ente'yes' and continue.
Afterwords, when oracle connect to the remote node, it won't be asked
for the password.
[oracle@node2-pub
oracle]$ ssh
node1-prv date
The authenticity of host
'node1-prv (192.168.203.1)' can't be established.
RSA key fingerprint is
<********************************************>
Are you sure you want to continue
connecting (yes/no)? yes
Warning: Permanently added
'node1-prv,192.168.203.1' (RSA) to the list of known hosts.
Sun Dec 18 20:01:09 CST 2005
[oracle@node2-pub oracle]$ ssh
node1-prv date
Sun Dec 18 20:01:13 CST 2005
[oracle@node2-pub oracle]$
[oracle@node2-pub oracle]$ ssh
node2-prv date
Warning: Permanently added the
RSA host key for IP address
'192.168.203.2' to the list of known hosts.
Sun Dec 18 20:14:16 CST 2005
[oracle@node2-pub oracle]$ ssh
node2-pub date
Sun Dec 18 20:15:05 CST 2005
If
you get then below erorr message
when try to connect to remote node, please make sure that the firewall
is disabled on the
remote node.
[root@node2-pub
root]# telnet
node1-prv
Trying 192.168.203.1...
telnet: Unable to connect
to remote host: No route to host
Configuring
System for Shared Disk
Storage
Device (iSCSI based IP SAN):
Every
node in the cluster must have access to the shared disk. So the
shared disk must support the concurrent access to all
nodes in cluster
in order to successfully build 11g RAC. There are so many Storage
Management OSes are available in the market
that allows you to build NAS/SAN appliances. I have chosen 'openfiler' as it is Linux
2.6 kernel based Storage Management OS and
it is powered by open source applications such as iSCSI.
You can attach any type of external disks to this server and that can be
presented as iscsi devices. You can then create volume groups on
this device(s) and later these volume groups are discovered as
new scsi devices on the RAC nodes.
Steps
Involved to install/configure iSCSI based IP SAN.
(1) install
openfiler OS
(2) Attach external disks to this server
I have attached the 500 GB WD USB (MyBook)
hard drive.
I planned to create 4 volumes for ASM file
system each of 100GB and one for OCFS2
asm-dsk1, asm-dsk2, asm-dsk3, asm-dsk4 and ocfs-dsk
ASM: DATA
and FLASH volume for database files
and Flash Recovery Area files.
OCFS2:
OCR, Voting Disks.
(3) Configure
openfiler setup -- iscsi-target/volume groups/shared access etc.
I
have followed the above guide to configure the openfiler system and
create the volumes for ASM disks and OCFS disks.
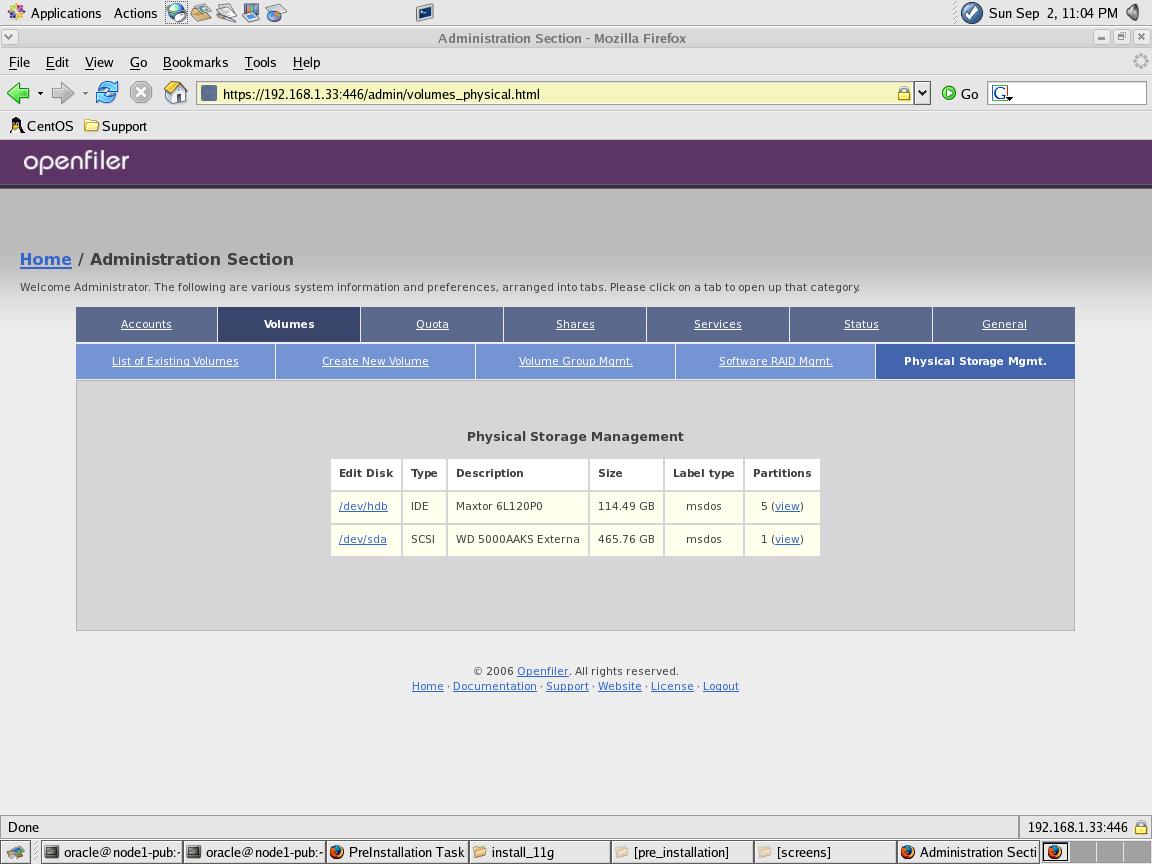
Below are the
sample screen shots for my openfiler setup.
The external
disks is presented to the server as SCSI disks as shown
below. In my case it is /dev/sda. I have created physical volume on
this device
and then created volume group rac11g on entire physical
volume.
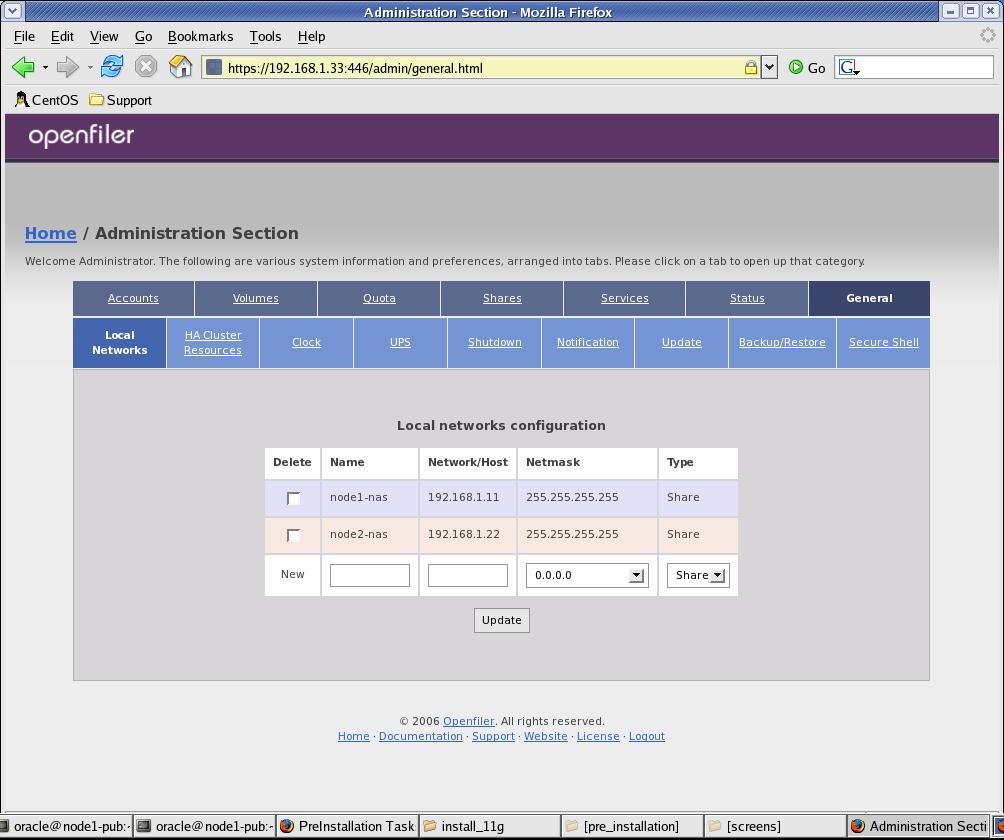
The below 5 volumes are created under the rac11g volume group.
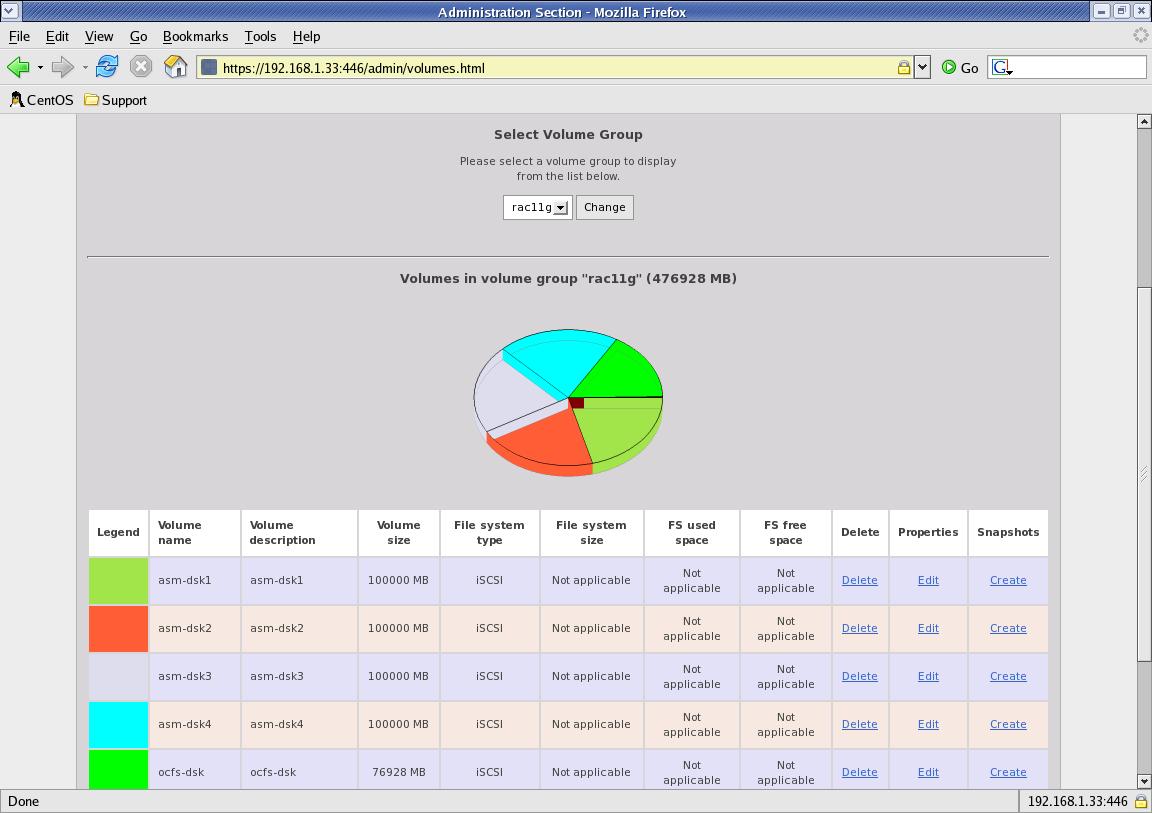
Also make sure
that each volumes allows the shared access to all
the nodes in the cluster. You can do that by clicking the 'Edit' link
on the above screen
for each
volume name as shown below.
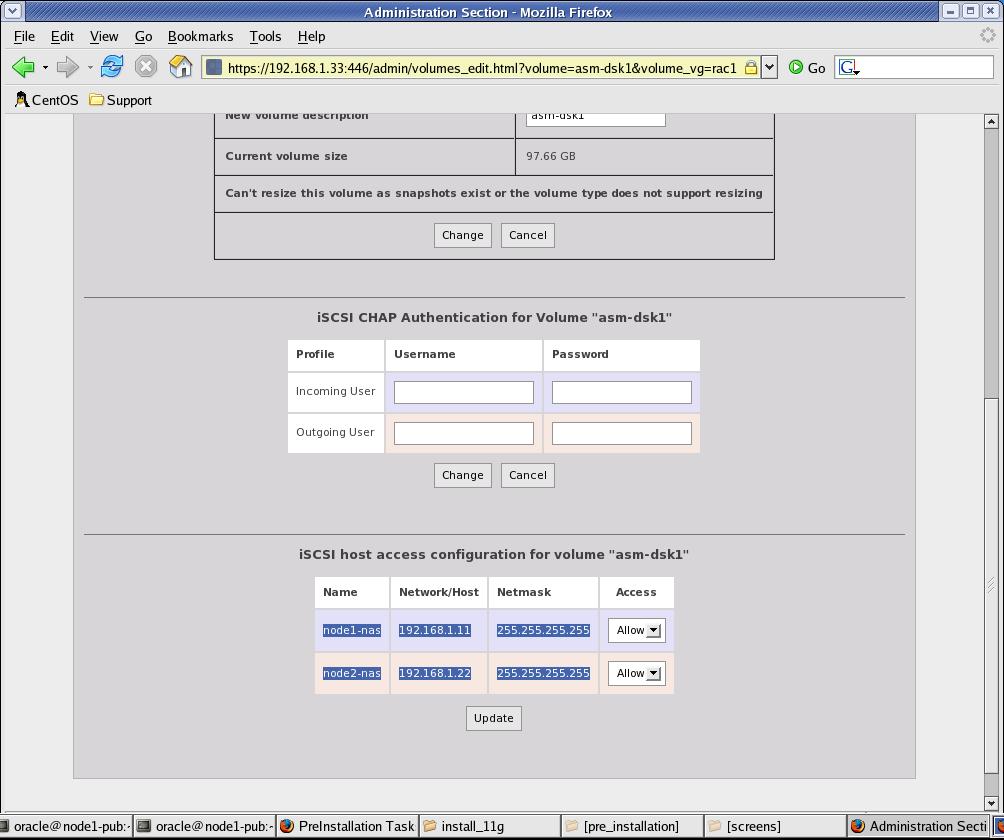
The below screen
shows that both the
nodes in the cluster has shared access on the storage. Click on the
General tab to add/modify the rac nodes info.
The network
information provided in this table are provate network for
the shared storage.
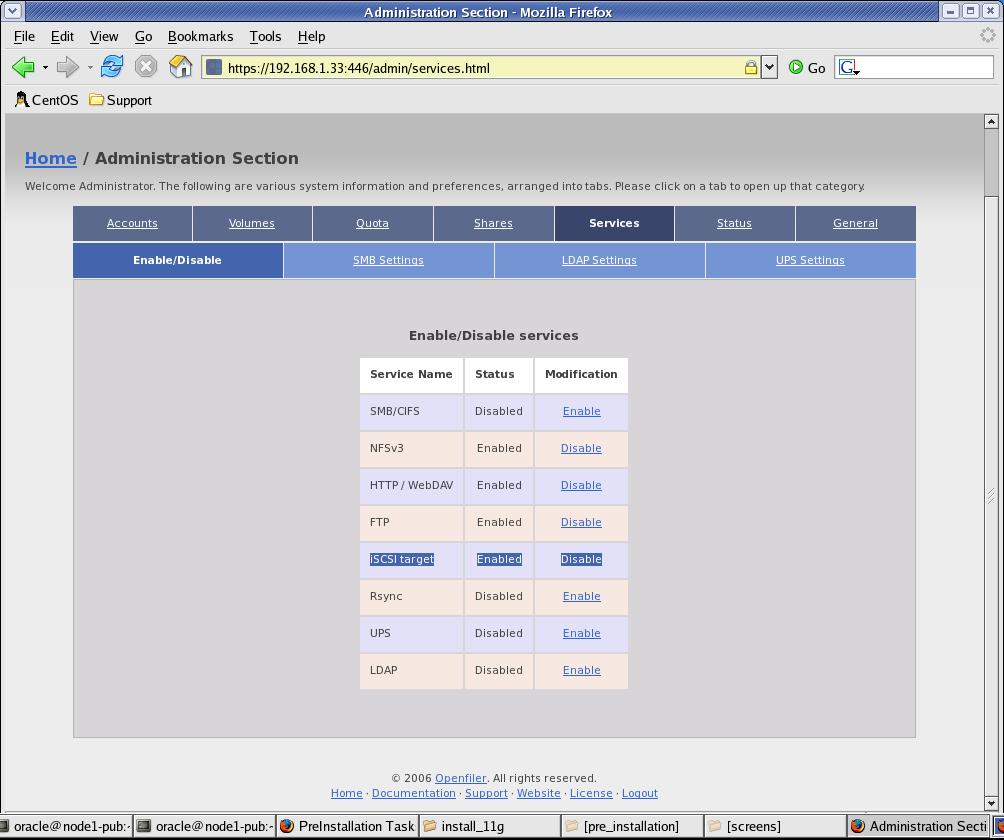
At the End,
make sure that iSCSI protocol is enabled in openfiler. You
can enable by clicking on the services tab.
(4)
Discovering
the volumes to the RAC nodes as scsi devices
NOTE: make sure that SELinux and
firewall has been disabled on all the
RAC nodes. If not, then disable by "Administraion Sections"
--> "system settings" -->
"security Level"
Make
Sure that the service iscsi-target is running on nas-server:
[root@nas-server
~]# service iscsi-target status
ietd
(pid 10688) is running...
[root@nas-server
~]#
on
all the RAC nodes:
Make
sure that the iscsi-initiator is installed on RAC nodes. If not, then
downlaod
the specified RPM
and
istall them.
[root@node1-pub
rpms]# rpm -qa | grep iscsi
iscsi-initiator-utils-4.0.3.0-5
[root@node1-pub
rpms]# service iscsi start -- if not already running
[root@node1-pub
rpms]# service iscsi status
iscsid
(pid 3256 3253) is running...
Configure
nodes for the Disk Discovery:
Edit
the /etc/iscsi.conf and assign the address of the iscsi target
to
the below parameter:
#
--------------------------
#
Discovery Address Category
#
--------------------------
#
To localize parameters to targets found on a particular discovery
address
#
(i.e., to override the global settings), you need to use the
#
"DiscoveryAddress" setting. The format for the
"DiscoveryAddress" setting is
#
a.b.c.d, a.b.c.d:e (where e is a TCP port number), or an instance name.
An
#
example of these settings would be:
#
#DiscoveryAddress=10.4.100.0
# or
#DiscoveryAddress=10.4.100.1:3260
# or
DiscoveryAddress=192.168.1.33
# <-- This is the address of the
nas-server
#
(b)
Reboot
All the Nodes and run the iscsi-ls command to see if
the volumes have been discovered on the RAC nodes as scsi devices.
(c)
[root@node2-pub
rpms]# iscsi-ls
*******************************************************************************
SFNet
iSCSI Driver Version ...4:0.1.11-4(15-Jan-2007)
*******************************************************************************
TARGET
NAME
: iqn.2006-01.com.openfiler:rac11g.ocfs-dsk
TARGET
ALIAS
:
HOST
ID
: 0
BUS
ID
: 0
TARGET
ID
: 0
TARGET
ADDRESS
: 192.168.1.33:3260,1
SESSION
STATUS
: ESTABLISHED AT Sun
Sep 2 18:49:57 CDT 2007
SESSION
ID
: ISID 00023d000001 TSIH
1200
*******************************************************************************
TARGET
NAME
:
iqn.2006-01.com.openfiler:rac11g.asm-dsk4
TARGET
ALIAS
:
HOST
ID
: 1
BUS
ID
: 0
TARGET
ID
: 0
TARGET
ADDRESS
: 192.168.1.33:3260,1
SESSION
STATUS
: ESTABLISHED AT Sun
Sep 2 18:49:57 CDT 2007
SESSION
ID
: ISID 00023d000001 TSIH
1000
*******************************************************************************
TARGET
NAME
:
iqn.2006-01.com.openfiler:rac11g.asm-dsk3
TARGET
ALIAS
:
HOST
ID
: 2
BUS
ID
: 0
TARGET
ID
: 0
TARGET
ADDRESS
: 192.168.1.33:3260,1
SESSION
STATUS
: ESTABLISHED AT Sun
Sep 2 18:49:57 CDT 2007
SESSION
ID
: ISID 00023d000001 TSIH
1100
*******************************************************************************
TARGET
NAME
:
iqn.2006-01.com.openfiler:rac11g.asm-dsk2
TARGET
ALIAS
:
HOST
ID
: 3
BUS
ID
: 0
TARGET
ID
: 0
TARGET
ADDRESS
: 192.168.1.33:3260,1
SESSION
STATUS
: ESTABLISHED AT Sun
Sep 2 18:49:57 CDT 2007
SESSION
ID
: ISID 00023d000001 TSIH
1300
*******************************************************************************
TARGET
NAME
:
iqn.2006-01.com.openfiler:rac11g.asm-dsk1
TARGET
ALIAS :
HOST
ID
: 4
BUS
ID
: 0
TARGET
ID
: 0
TARGET
ADDRESS
: 192.168.1.33:3260,1
SESSION
STATUS
: ESTABLISHED AT Sun
Sep 2 18:49:58 CDT 2007
SESSION
ID
: ISID 00023d000001 TSIH
1400
*******************************************************************************
[root@node2-pub
rpms]#
(4)
Map the Volumes on the iscsi-target (nas-server) to the Disks disceverd
on the
local RAC nodes.
Host
ID
Target ID
discovered
as
0
iqn.2006-01.com.openfiler:rac11g.ocfs-dsk
---
1
iqn.2006-01.com.openfiler:rac11g.asm-dsk4
---
2
iqn.2006-01.com.openfiler:rac11g.asm-dsk3
---
3
iqn.2006-01.com.openfiler:rac11g.asm-dsk2
---
4
iqn.2006-01.com.openfiler:rac11g.asm-dsk1
---
Now,
run the below command to find out the "Attached" devices to the Host
IDs. The scsi Id in this
output
maps to the Host ID on the "iscsi-ls" output.
[root@node2-pub
rpms]# dmesg | grep Attached
Attached
scsi disk sda at scsi0, channel 0,
id 0, lun
0
Attached
scsi disk sdb at scsi1, channel 0,
id 0, lun
0
Attached
scsi disk sdc at scsi2, channel 0,
id 0, lun
0
Attached
scsi disk sdd at scsi3, channel 0,
id 0, lun
0
Attached
scsi disk sde at scsi4, channel 0,
id 0, lun
0
In
first line, scsi0 (Host Id 0) has device "sda" attahced to it. So, By
filling the above table
with
this information gives the mapping of discovered Disks at client to its
actual
Volums on the iscsi-target.
Host ID
Target
ID
Volume
Name discovered as
0
iqn.2006-01.com.openfiler:rac11g.ocfs-dsk
ocfs-dsk
sda
1
iqn.2006-01.com.openfiler:rac11g.asm-dsk4
asm-dsk4
sdb
2
iqn.2006-01.com.openfiler:rac11g.asm-dsk3
asm-dks3
sdc
3
iqn.2006-01.com.openfiler:rac11g.asm-dsk2
asm-dsk2
sdd
4
iqn.2006-01.com.openfiler:rac11g.asm-dsk1
asm-dsk1
sde
Partitioning
the
Shared disk:
I am going to have 4 disks
assigned to ASM and one for OCFS. So, I have created a single partition
on
these 5 disks. Create partitions
from ONLY one of the available RAC
nodes. This can be any node in cluster.
[root@node1-pub
~]# fdisk -l
Disk
/dev/hda: 160.0 GB, 160041885696 bytes
255
heads, 63 sectors/track, 19457 cylinders
Units
= cylinders of 16065 * 512 = 8225280 bytes
Device Boot
Start
End Blocks
Id System
/dev/hda1 *
1
13 104391
83 Linux
/dev/hda2
14 19457
156183930 8e
Linux LVM
Disk
/dev/sda: 80.6 GB, 80664854528 bytes
255
heads, 63 sectors/track, 9806 cylinders
Units
= cylinders of 16065 * 512 = 8225280 bytes
Disk
/dev/sda doesn't contain a valid partition table
Disk
/dev/sdb: 104.8 GB, 104857600000 bytes
255
heads, 63 sectors/track, 12748 cylinders
Units
= cylinders of 16065 * 512 = 8225280 bytes
Disk
/dev/sdb doesn't contain a valid partition table
Disk
/dev/sdc: 104.8 GB, 104857600000 bytes
255
heads, 63 sectors/track, 12748 cylinders
Units
= cylinders of 16065 * 512 = 8225280 bytes
Disk
/dev/sdc doesn't contain a valid partition table
Disk
/dev/sdd: 104.8 GB, 104857600000 bytes
255
heads, 63 sectors/track, 12748 cylinders
Units
= cylinders of 16065 * 512 = 8225280 bytes
Disk
/dev/sdd doesn't contain a valid partition table
Disk
/dev/sde: 104.8 GB, 104857600000 bytes
255
heads, 63 sectors/track, 12748 cylinders
Units
= cylinders of 16065 * 512 = 8225280 bytes
Disk
/dev/sde doesn't contain a valid partition table
----==========Create
partitions================
[root@node1-pub
~]# fdisk /dev/sda
Device
contains neither a valid DOS partition table, nor Sun, SGI or OSF
disklabel
Building
a new DOS disklabel. Changes will remain in memory only,
until
you decide to write them. After that, of course, the previous
content
won't be recoverable.
The
number of cylinders for this disk is set to 9806.
There
is nothing wrong with that, but this is larger than 1024,
and
could in certain setups cause problems with:
1)
software that runs at boot time (e.g., old versions of LILO)
2)
booting and partitioning software from other OSs
(e.g., DOS FDISK, OS/2 FDISK)
Warning:
invalid flag 0x0000 of partition table 4 will be corrected by w(rite)
Command
(m for help): n
Command
action
e
extended
p
primary partition (1-4)
p
Partition
number (1-4): 1
First
cylinder (1-9806, default 1):
Using
default value 1
Last
cylinder or +size or +sizeM or +sizeK (1-9806, default 9806):
Using
default value 9806
Command
(m for help): w
The
partition table has been altered!
Calling
ioctl() to re-read partition table.
Syncing
disks.
[root@node1-pub
~]# fdisk /dev/sdb
Device
contains neither a valid DOS partition table, nor Sun, SGI or OSF
disklabel
Building
a new DOS disklabel. Changes will remain in memory only,
until
you decide to write them. After that, of course, the previous
content
won't be recoverable.
The
number of cylinders for this disk is set to 12748.
There
is nothing wrong with that, but this is larger than 1024,
and
could in certain setups cause problems with:
1)
software that runs at boot time (e.g., old versions of LILO)
2)
booting and partitioning software from other OSs
(e.g., DOS FDISK, OS/2 FDISK)
Warning:
invalid flag 0x0000 of partition table 4 will be corrected by w(rite)
Command
(m for help): n
Command
action
e
extended
p
primary partition (1-4)
p
Partition
number (1-4): 1
First
cylinder (1-12748, default 1):
Using
default value 1
Last
cylinder or +size or +sizeM or +sizeK (1-12748, default 12748):
Using
default value 12748
Command
(m for help): w
The
partition table has been altered!
Calling
ioctl() to re-read partition table.
Syncing
disks.
[root@node1-pub
~]# fdisk /dev/sdc
Device
contains neither a valid DOS partition table, nor Sun, SGI or OSF
disklabel
Building
a new DOS disklabel. Changes will remain in memory only,
until
you decide to write them. After that, of course, the previous
content
won't be recoverable.
The
number of cylinders for this disk is set to 12748.
There
is nothing wrong with that, but this is larger than 1024,
and
could in certain setups cause problems with:
1)
software that runs at boot time (e.g., old versions of LILO)
2)
booting and partitioning software from other OSs
(e.g., DOS FDISK, OS/2 FDISK)
Warning:
invalid flag 0x0000 of partition table 4 will be corrected by w(rite)
Command
(m for help): n
Command
action
e
extended
p
primary partition (1-4)
p
Partition
number (1-4): 1
First
cylinder (1-12748, default 1):
Using
default value 1
Last
cylinder or +size or +sizeM or +sizeK (1-12748, default 12748):
Using
default value 12748
Command
(m for help): p
Disk
/dev/sdc: 104.8 GB, 104857600000 bytes
255
heads, 63 sectors/track, 12748 cylinders
Units
= cylinders of 16065 * 512 = 8225280 bytes
Device Boot
Start
End Blocks
Id System
/dev/sdc1
1 12748
102398278+ 83 Linux
Command
(m for help): w
The
partition table has been altered!
Calling
ioctl() to re-read partition table.
Syncing
disks.
[root@node1-pub
~]# fdisk /dev/sdd
Device
contains neither a valid DOS partition table, nor Sun, SGI or OSF
disklabel
Building
a new DOS disklabel. Changes will remain in memory only,
until
you decide to write them. After that, of course, the previous
content
won't be recoverable.
The
number of cylinders for this disk is set to 12748.
There
is nothing wrong with that, but this is larger than 1024,
and
could in certain setups cause problems with:
1)
software that runs at boot time (e.g., old versions of LILO)
2)
booting and partitioning software from other OSs
(e.g., DOS FDISK, OS/2 FDISK)
Warning:
invalid flag 0x0000 of partition table 4 will be corrected by w(rite)
Command
(m for help): n
Command
action
e
extended
p
primary partition (1-4)
p
Partition
number (1-4): 1
First
cylinder (1-12748, default 1):
Using
default value 1
Last
cylinder or +size or +sizeM or +sizeK (1-12748, default 12748):
Using
default value 12748
Command
(m for help): p
Disk
/dev/sdd: 104.8 GB, 104857600000 bytes
255
heads, 63 sectors/track, 12748 cylinders
Units
= cylinders of 16065 * 512 = 8225280 bytes
Device Boot
Start
End Blocks
Id System
/dev/sdd1
1 12748
102398278+ 83 Linux
Command
(m for help): w
The
partition table has been altered!
Calling
ioctl() to re-read partition table.
Syncing
disks.
[root@node1-pub
~]# fdisk /dev/sde
Device
contains neither a valid DOS partition table, nor Sun, SGI or OSF
disklabel
Building
a new DOS disklabel. Changes will remain in memory only,
until
you decide to write them. After that, of course, the previous
content
won't be recoverable.
The
number of cylinders for this disk is set to 12748.
There
is nothing wrong with that, but this is larger than 1024,
and
could in certain setups cause problems with:
1)
software that runs at boot time (e.g., old versions of LILO)
2)
booting and partitioning software from other OSs
(e.g., DOS FDISK, OS/2 FDISK)
Warning:
invalid flag 0x0000 of partition table 4 will be corrected by w(rite)
Command
(m for help): n
Command
action
e
extended
p
primary partition (1-4)
p
Partition
number (1-4): 1
First
cylinder (1-12748, default 1):
Using
default value 1
Last
cylinder or +size or +sizeM or +sizeK (1-12748, default 12748):
Using
default value 12748
Command
(m for help): p
Disk
/dev/sde: 104.8 GB, 104857600000 bytes
255
heads, 63 sectors/track, 12748 cylinders
Units
= cylinders of 16065 * 512 = 8225280 bytes
Device Boot
Start
End Blocks
Id System
/dev/sde1
1 12748
102398278+ 83 Linux
Command
(m for help): w
The
partition table has been altered!
Calling
ioctl() to re-read partition table.
Syncing
disks.
[root@node1-pub
~]#
Listing
the Partitions:
[root@node1-pub
~]# fdisk -l
Disk
/dev/hda: 160.0 GB, 160041885696 bytes
255
heads, 63 sectors/track, 19457 cylinders
Units
= cylinders of 16065 * 512 = 8225280 bytes
Device Boot
Start
End Blocks
Id System
/dev/hda1 *
1
13 104391
83 Linux
/dev/hda2
14 19457
156183930 8e
Linux LVM
Disk
/dev/sda: 80.6 GB, 80664854528 bytes
255
heads, 63 sectors/track, 9806 cylinders
Units
= cylinders of 16065 * 512 = 8225280 bytes
Device Boot
Start
End Blocks
Id System
/dev/sda1
1 9806
78766663+ 83 Linux
Disk
/dev/sdb: 104.8 GB, 104857600000 bytes
255
heads, 63 sectors/track, 12748 cylinders
Units
= cylinders of 16065 * 512 = 8225280 bytes
Device Boot
Start
End Blocks
Id System
/dev/sdb1
1 12748
102398278+ 83 Linux
Disk
/dev/sdc: 104.8 GB, 104857600000 bytes
255
heads, 63 sectors/track, 12748 cylinders
Units
= cylinders of 16065 * 512 = 8225280 bytes
Device Boot
Start
End
Blocks
Id
System
/dev/sdc1
1 12748
102398278+ 83 Linux
Disk
/dev/sdd: 104.8 GB, 104857600000 bytes
255
heads, 63 sectors/track, 12748 cylinders
Units
= cylinders of 16065 * 512 = 8225280 bytes
Device Boot
Start
End
Blocks
Id System
/dev/sdd1
1 12748
102398278+ 83 Linux
Disk
/dev/sde: 104.8 GB, 104857600000 bytes
255
heads, 63 sectors/track, 12748 cylinders
Units
= cylinders of 16065 * 512 = 8225280 bytes
Device Boot
Start
End Blocks
Id System
/dev/sde1
1 12748
102398278+ 83 Linux
[root@node1-pub
~]#
Issues and Problems in openfiler
Configuration:
1.
Devices
disappear after reboot of Openfiler Server (nas-server):
I have seen that the iscsi devices
no longer available on rac nodes after reboot of nas-server (Openfiler).
This
is most likely becasue the volume groups are not scanned after the
reboot on Openfiler server. I have included the necessary commands
to
scan and activate these volume groups into the scartup scrips
(/etc/rc.local) after every reboot of openfiler server.
Also
Make sure that firewall and SELinux is disabled on all the machines in
configurations.
SOLUTION:
Following the below steps resoves the mentioned issue in my case.
- stop the iscsi-target on
nas-server as root -- service
iscsi-target stop
- Scan the systems for the
volume groups as
root -- vgscan
- Activate the volumes as
root -- vgchange -ay
- start the iscsi-target on
nas-server as
root -- service
iscsi-target start
- confirm that volumegroups
are available as
root -- lvdisplay
- On the clinet machines
(in mycase node1-pub and node2-pub),
restart the iscsi service as root --
service iscsi restart
- Confirm that the iscsi
devices are available as
root -- iscsi-ls
In
/etc/rc.local on nas-server (openfiler) add below lines:
vgscan
vgchange
-ay
service iscsi-target restart
In
/etc/rc.local on each node (openfiler) add below line:
service
iscsi restart
2. Device name not persistent
after reboot of RAC nodes (node1-pub, node2-pub):
I
have seen that the iscsi device
names are changed after reboot of rac nodes. For e.g, device /dev/sda1
now becomes /dev/sdb1 after reboot.
This cause a very serious issues in case of OCR and Vote Discs as well
as the Discs formatted with ocfs2 devices. They don't get mounted
automatically
because they are not persistent after reboot. While googling
on how to overcome this issue, I came accross a utility called
"devlabel" that are
developed by Dell Inc and it is available to download free from Dell's
Official Website.
This utility creates the symlink to the device names by considering
physical devices'
UUID. So, even after the reboot, the UUID for any devices stays at it
is and so the symlink that you create using devlabel always points to
the UUID of the device.
NOTE: You do not need to create symlink using devlabel for the devices
that you are going to use for ASM disks.
- DOWNLOAD the latest rpm
of devlabel from Dell's website:
- Install it on all the RAC nodes:
[root@node1-pub
Desktop]# rpm -ivh devlabel-0.48.01-1.i386.rpm
warning:
devlabel-0.48.01-1.i386.rpm: V3 DSA signature: NOKEY, key ID 23b66a9d
Preparing...
########################################### [100%]
1:devlabel
########################################### [100%]
[root@node1-pub
Desktop]#
3. Create the SYMLINK
using the
devlabel (All the RAC nodes):
(A). Get the
Host ID and the Devices attached to that ID by below command:
[root@node1-pub
~]# dmesg | grep Attached
Attached
scsi disk sda at scsi5, channel 0, id 0, lun 0
Attached
scsi disk sdb at scsi8, channel 0, id 0, lun 0
Attached
scsi disk sdc at scsi6, channel 0, id 0, lun 0
Attached
scsi disk sdd at scsi9, channel 0, id 0, lun 0
Attached
scsi disk sde at scsi7, channel 0, id 0, lun 0
(B). Get the Target
Name associated to each Host ID by below
command:
[root@node1-pub
~]# iscsi-ls
*******************************************************************************
SFNet
iSCSI Driver Version ...4:0.1.11-4(15-Jan-2007)
*******************************************************************************
TARGET
NAME
: iqn.2006-01.com.openfiler:rac11g.ocfs-dsk
TARGET
ALIAS
:
HOST
ID
: 5
BUS
ID
: 0
TARGET
ID
: 0
TARGET
ADDRESS :
192.168.1.33:3260,1
SESSION
STATUS :
ESTABLISHED AT Fri Sep 28 16:27:45 CDT 2007
SESSION
ID
: ISID 00023d000001 TSIH 1a00
*******************************************************************************
TARGET
NAME
: iqn.2006-01.com.openfiler:rac11g.asm-dsk4
TARGET
ALIAS
:
HOST
ID
: 6
BUS
ID
: 0
TARGET
ID
: 0
TARGET
ADDRESS :
192.168.1.33:3260,1
SESSION
STATUS :
ESTABLISHED AT Fri Sep 28 16:27:46 CDT 2007
SESSION
ID
: ISID 00023d000001 TSIH 1b00
*******************************************************************************
TARGET
NAME
: iqn.2006-01.com.openfiler:rac11g.asm-dsk3
TARGET
ALIAS
:
HOST
ID
: 7
BUS
ID
: 0
TARGET
ID
: 0
TARGET
ADDRESS :
192.168.1.33:3260,1
SESSION
STATUS :
ESTABLISHED AT Fri Sep 28 16:27:46 CDT 2007
SESSION
ID
: ISID 00023d000001 TSIH 1e00
*******************************************************************************
TARGET
NAME
: iqn.2006-01.com.openfiler:rac11g.asm-dsk2
TARGET
ALIAS
:
HOST
ID
: 8
BUS
ID
: 0
TARGET
ID
: 0
TARGET
ADDRESS :
192.168.1.33:3260,1
SESSION
STATUS :
ESTABLISHED AT Fri Sep 28 16:27:45 CDT 2007
SESSION
ID
: ISID 00023d000001 TSIH 1c00
*******************************************************************************
TARGET
NAME
: iqn.2006-01.com.openfiler:rac11g.asm-dsk1
TARGET
ALIAS
:
HOST
ID
: 9
BUS
ID
: 0
TARGET
ID
: 0
TARGET
ADDRESS :
192.168.1.33:3260,1
SESSION
STATUS :
ESTABLISHED AT Fri Sep 28 16:27:46 CDT 2007
SESSION
ID
: ISID 00023d000001 TSIH 1d00
*******************************************************************************
(C).
Create SYMLINK using below command:
[root@node1-pub
~]# devlabel add -d /dev/sdc1 -s /dev/ocfs2
SYMLINK:
/dev/ocfs2 -> /dev/sde1
Added
/dev/ocfs2 to /etc/sysconfig/devlabel
[root@node1-pub
~]#
[root@node1-pub
~]# devlabel add -d /dev/sde1 -s /dev/asmdsk4
SYMLINK:
/dev/asmdsk4 -> /dev/sde1
Added
/dev/asmdsk4 to /etc/sysconfig/devlabel
[root@node1-pub
~]#
[root@node1-pub
~]# devlabel add -d /dev/sde1 -s /dev/asmdsk3
SYMLINK:
/dev/asmdsk3 -> /dev/sde1
Added
/dev/asmdsk3 to /etc/sysconfig/devlabel
[root@node1-pub
~]#
[root@node1-pub
~]# devlabel add -d /dev/sdb1 -s /dev/asmdsk2
SYMLINK:
/dev/asmdsk2 -> /dev/sdb1
[root@node1-pub
~]#
Added
/dev/asmdsk2 to /etc/sysconfig/devlabel
[root@node1-pub
~]# devlabel add -d /dev/sdd1 -s /dev/asmdsk1
SYMLINK:
/dev/asmdsk1 -> /dev/sdd1
[root@node1-pub
~]#
Added
/dev/asmdsk1 to /etc/sysconfig/devlabel
[root@node1-pub
~]#
(D).
Confirm that the symlinks are associated with the UUID of each physical
devices (All RAC Nodes)
[root@node1-pub
~]# cat /etc/sysconfig/devlabel
#
devlabel configuration file
#
#
This
file should generally not be edited by hand.
#
Instead, use the /sbin/devlabel program to make changes.
#
devlabel by Gary Lerhaupt <gary_lerhaupt@dell.com>
#
#
format: <SYMLINK> <DEVICE> <UUID>
#
or
format: <RAWDEVICE> <DEVICE> <UUID>
/dev/ocfs2
/dev/sda1
S83.1:4f70656e66696c000000000005000000b92700000e000000OpenfileVirtualdisksector63-157533389
/dev/asmdsk4
/dev/sdc1
S83.1:4f70656e66696c000000000004000000a52700000e000000OpenfileVirtualdisksector63-204796619
/dev/asmdsk3
/dev/sde1
S83.1:4f70656e66696c000000000003000000912700000e000000OpenfileVirtualdisksector63-204796619
/dev/asmdsk2
/dev/sdb1
S83.1:4f70656e66696c0000000000020000007d2700000e000000OpenfileVirtualdisksector63-204796619
/dev/asmdsk1
/dev/sdd1
S83.1:4f70656e66696c000000000001000000672700000e000000OpenfileVirtualdisksector63-204796619
[root@node1-pub
~]#
(E).
Mount the ocfs2 devices under the appropriate mount point and update
the /etc/fstab (in my case it is /u02/ocfs2):
[root@node1-pub
~]# mount -t ocfs2 -o datavolume,nointr /dev/ocfs2 /u02/ocfs2
[root@node1-pub
~]# vi /etc/fstab
[root@node1-pub
~]# cat /etc/fstab
#
This
file is edited by fstab-sync - see 'man fstab-sync' for details
/dev/VolGroup00/LogVol00
/
ext3
defaults 1 1
LABEL=/boot
/boot
ext3
defaults 1 2
none
/dev/pts
devpts gid=5,mode=620 0 0
none
/dev/shm
tmpfs defaults 0 0
none
/proc
proc
defaults 0 0
none
/sys
sysfs defaults 0 0
/dev/VolGroup00/LogVol01
swap
swap
defaults 0 0
##
OCFS2
mountpoint
/dev/ocfs2
/u02/ocfs2
ocfs2 _netdev,datavolume,nointr 0 0
/dev/hdc
/media/cdrom
auto pamconsole,exec,noauto,managed 0 0
/dev/fd0
/media/floppy
auto pamconsole,exec,noauto,managed 0 0
(F).
Update the /etc/rc.local files (All RAC nodes)
I have seen
that after reboot of RAC nodes, the devlabel deos not get
started automatically and so the ocfs2 mountpoint
gets failed
because there is no SYMLINK named /dev/ocfs2 in the kernel
that points to ocfs2 disk. So, I have to reload the SYMLINKs
and mount the
ocfs2 device manually after the reboot. as shown below:
[root@node1-pub
~]# devlabel reload
SYMLINK:
/dev/ocfs2 -> /dev/sda1
SYMLINK:
/dev/asmdsk4 -> /dev/sdb1
SYMLINK:
/dev/asmdsk3 -> /dev/sdc1
SYMLINK:
/dev/asmdsk2 -> /dev/sdd1
SYMLINK:
/dev/asmdsk1 -> /dev/sde1
[root@node1-pub
~]#
[root@node1-pub
~]# mount -t ocfs2 -o datavolume,nointr /dev/sda1 /u02/ocfs2
[root@node1-pub
~]#
[root@node1-pub
~]# mount
/dev/mapper/VolGroup00-LogVol00
on / type ext3 (rw)
none
on
/proc type proc (rw)
none
on
/sys type sysfs (rw)
none
on
/dev/pts type devpts (rw,gid=5,mode=620)
usbfs
on
/proc/bus/usb type usbfs (rw)
/dev/hda1
on /boot type ext3 (rw)
none
on
/dev/shm type tmpfs (rw)
none
on
/proc/sys/fs/binfmt_misc type binfmt_misc (rw)
sunrpc
on
/var/lib/nfs/rpc_pipefs type rpc_pipefs (rw)
configfs
on /config type configfs (rw)
ocfs2_dlmfs
on /dlm type ocfs2_dlmfs (rw)
oracleasmfs
on /dev/oracleasm type oracleasmfs (rw)
/dev/sda1 on
/u02/ocfs2 type ocfs2 (rw,_netdev,datavolume,nointr,heartbeat=local)
To
avoid manual intervention, I added the below entries into start up
scripts /etc/rc.local file.
THe
below is the
sample output of my /etc/rc.local
#
Affirms
the mappings of symlinks to storage
devices. If a
#
device cannot be found by its UUID, the existing symlink
will
#
be
deleted. If the device name has changed, it will update the
#
symlink. Both start and restart are synonyms for this command.
service
iscsi restart
devlabel
reload
mount
-t
ocfs2 -o datavolume,nointr /dev/ocfs2 /u02/ocfs2
Installing
and Configuring OCFS2
(Oracle Cluster File System):
I
have followed the OCFS2 setup
guide to install and
configure the OCFS2. I also recomment to follow the same guide while
setting up OCFS2 for your Prod system.
Download
and Install the required
rpms:
Please download the below rpms from
Oracle's
website and install them as
shown.
ocfs2-2.6.9-55.0.2.EL-1.2.5-6.i686.rpm
ocfs2-tools-1.2.4-1.i386.rpm
ocfs2-tools-debuginfo-1.2.4-1.i386.rpm
ocfs2-tools-devel-1.2.4-1.i386.rpm
[root@node1-pub
rpms]# rpm -ivh ocfs2-2.6.9-55.0.2.EL-1.2.5-6.i686.rpm \
>
ocfs2-tools-1.2.4-1.i386.rpm \
>
ocfs2console-1.2.4-1.i386.rpm \
>
ocfs2-tools-debuginfo-1.2.4-1.i386.rpm \
>
ocfs2-tools-devel-1.2.4-1.i386.rpm
Preparing...
########################################### [100%]
1:ocfs2-tools
########################################### [ 20%]
2:ocfs2-2.6.9-55.0.2.EL
########################################### [
40%]
3:ocfs2console
########################################### [ 60%]
4:ocfs2-tools-debuginfo
########################################### [
80%]
5:ocfs2-tools-devel
########################################### [100%]
[root@node1-pub
rpms]#
Configure
OCFS2:
The
configuration of the ocfs2 resides in the /etc/ocfs2/cluster.conf file
that is generated by running ocfs2console
command and then is prapogated
to different
nodes in the cluster. Below are the screen shots for the
ocfs2 configuration process.
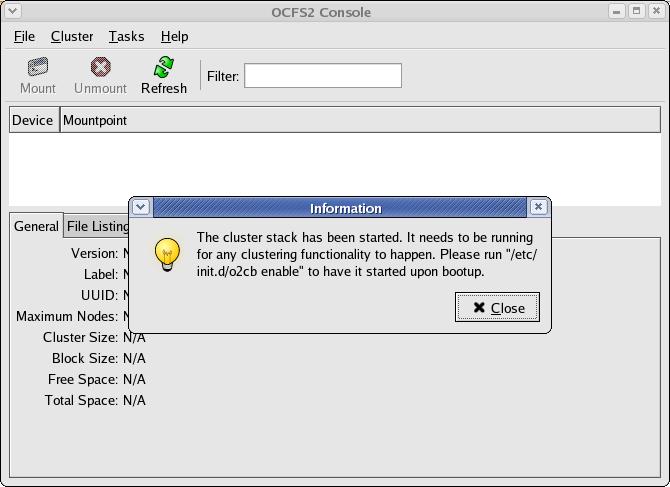
Running
ocfs2console command line utility brings this screen.
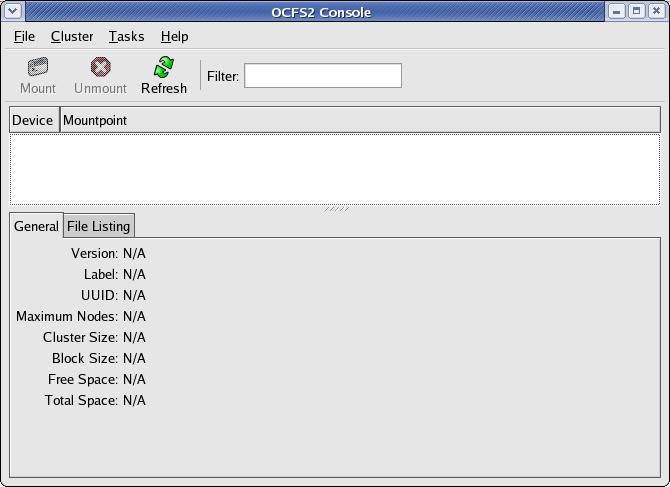
You can close this box as you can
enable the o2cb service later.
Click
Cluster --> Configure Nodes. Add node names for each
node one-by-one.
Make sure to
add exact same node name as it has been returned by the `hostname` command.
My host name
names are node1-pub.hingu.net and node2-pub.hingu.net for node 1 and
node 2 respectively.
Prapogate the files to all the nodes
in cluster:
So, the above
settings of "Name" (node1-nas and node2-nas) in the ocfs2 configuraion
will lead to
below error
when I try to enable o2cb service.
[root@node1-pub
rpms]# /etc/init.d/o2cb enable
Writing
O2CB configuration: OK
Starting
O2CB cluster ocfs2: Failed
Cluster
ocfs2 created
Node
node1-nas added
Node
node2-nas added
o2cb_ctl:
Configuration error discovered while populating cluster ocfs2. None of its nodes were considered local. A node is considered local when its node name
in the configuration matches this machine's host name.
Stopping
O2CB cluster ocfs2: OK
[root@node1-pub
rpms]#
So, stop o2cb
service,
open the /etc/ocfs2/cluster.conf file and update the hostname value to
the one that is returned by `hostname` command.
Do not update the
IP. Start the service and load it again and the error should go away.
--=================
[oracle@node2-pub
~]$ cat /etc/ocfs2/cluster.conf
node:
ip_port = 7777
ip_address = 192.168.0.11
number = 0
name = node1-pub.hingu.net
cluster = ocfs2
node:
ip_port = 7777
ip_address = 192.168.0.22
number = 1
name = node2-pub.hingu.net
cluster = ocfs2
cluster:
node_count = 2
name = ocfs2
--================
[root@node2-pub
rpms]# /etc/init.d/o2cb load
Loading
module "configfs": OK
Creating
directory '/config': OK
Mounting
configfs filesystem at /config: OK
Loading
module "ocfs2_nodemanager": OK
Loading
module "ocfs2_dlm": OK
Loading
module "ocfs2_dlmfs": OK
Creating
directory '/dlm': OK
Mounting
ocfs2_dlmfs filesystem at /dlm: OK
[root@node2-pub
rpms]# /etc/init.d/o2cb status
Module
"configfs": Loaded
Filesystem
"configfs": Mounted
Module
"ocfs2_nodemanager": Loaded
Module
"ocfs2_dlm": Loaded
Module
"ocfs2_dlmfs": Loaded
Filesystem
"ocfs2_dlmfs": Mounted
Checking
O2CB cluster ocfs2: Offline
[root@node2-pub
rpms]#
Configure
o2cb to startup at Boot time:
[root@node2-pub
rpms]# /etc/init.d/o2cb configure
Configuring
the O2CB driver.
This
will configure the on-boot properties of the O2CB driver.
The
following questions will determine whether the driver is loaded on
boot. The current values will be shown in brackets
('[]'). Hitting
<ENTER>
without typing an answer will keep that current value.
Ctrl-C
will
abort.
Load
O2CB driver on boot (y/n) [n]: y
Cluster
to start on boot (Enter "none" to clear) [ocfs2]:
Specify
heartbeat dead threshold (>=7) [7]:
Specify
network idle timeout in ms (>=5000) [10000]:
Specify
network keepalive delay in ms (>=1000) [5000]:
Specify
network reconnect delay in ms (>=2000) [2000]:
Writing
O2CB configuration: OK
Starting
O2CB cluster ocfs2: OK
[root@node2-pub
rpms]#
[root@node2-pub
rpms]# chkconfig --add ocfs2
[root@node2-pub
rpms]# chkconfig --add o2cb
[root@node2-pub
rpms]# mkdir -p /u02/ocfs2 -- ocfs2 mountpoint
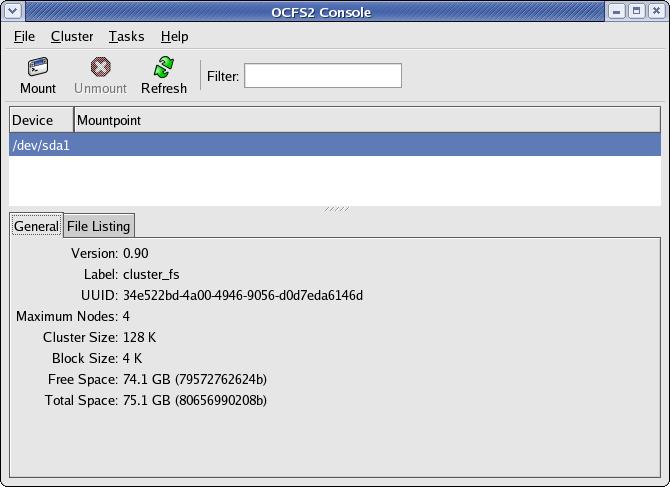
Format the filesystem
Select the
device that you want to format. In my case it is /dev/sda1
that I want to format for ocfs2.
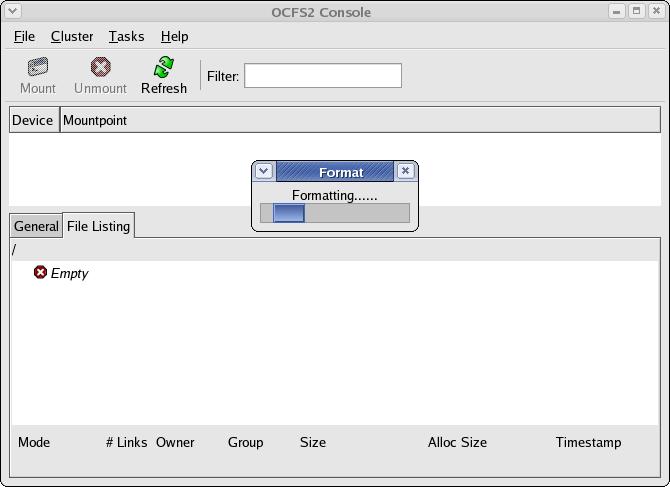
 I got the
below error while ocfs2 being mounted on the another node.
ERROR:
While mounting the same filesystem on another node.
[root@node2-pub
~]# mount -t ocfs2 /dev/sda1 /u02/ocfs2
mount.ocfs2:
Transport endpoint is not connected while mounting /dev/sda1 on
/u02/ocfs2.
Check 'dmesg' for more information on this error.
Solution:
Make sure that SELinux and Firewall has been disabled. If not, Disable
them and
reboot all the nodes,
I got the
below error while ocfs2 being mounted on the another node.
ERROR:
While mounting the same filesystem on another node.
[root@node2-pub
~]# mount -t ocfs2 /dev/sda1 /u02/ocfs2
mount.ocfs2:
Transport endpoint is not connected while mounting /dev/sda1 on
/u02/ocfs2.
Check 'dmesg' for more information on this error.
Solution:
Make sure that SELinux and Firewall has been disabled. If not, Disable
them and
reboot all the nodes,
and it should be ok.
Creating
Automatic Storage
Management (ASM) Disks for the Clustered Database:
Download the below rpms and
istalled them as root user on both the nodes.
[oracle@node2-pub ~]$ uname -a
Linux node2-pub.hingu.net 2.6.9-55.0.2.EL
#1 Tue Jun 26 14:08:18 EDT 2007 i686 i686 i386 GNU/Linux
[root@node1-pub
rpms]# rpm -ivh oracleasm-2.6.9-55.0.2.EL-2.0.3-1.i686.rpm \
>
oracleasmlib-2.0.2-1.i386.rpm \
>
oracleasm-support-2.0.3-1.i386.rpm
Preparing...
########################################### [100%]
1:oracleasm-support
########################################### [ 33%]
2:oracleasm-2.6.9-55.0.2.###########################################
[
67%]
3:oracleasmlib ###########################################
[100%]
[root@node1-pub
rpms]#
Configure ASM on both the nodes
[root@node1-pub
~]# /etc/init.d/oracleasm configure
Configuring
the Oracle ASM library driver.
This
will configure the on-boot properties of the Oracle ASM library
driver. The following questions will determine
whether the driver is
loaded
on boot and what permissions it will have.
The current values
will
be shown in brackets ('[]'). Hitting
<ENTER> without typing an
answer
will keep that current value. Ctrl-C
will abort.
Default
user to own the driver interface []: oracle
Default
group to own the driver interface []: dba
Start
Oracle ASM library driver on boot (y/n) [n]: y
Fix
permissions of Oracle ASM disks on boot (y/n) [y]:
Writing
Oracle ASM library driver configuration:
[
OK ]
Creating
/dev/oracleasm mount point:
[ OK ]
Loading
module "oracleasm":
[ OK ]
Mounting
ASMlib driver filesystem:
[ OK ]
Scanning
system for ASM disks:
[ OK ]
[root@node1-pub
~]#
Create ASM Disk Device(s) that
will be used in ASM diskgroup (stamping devises
as an ASM disks): from one node only
[root@node1-pub
~]# /etc/init.d/oracleasm createdisk DSK1 /dev/sdb1
Marking
disk "/dev/sdb1" as an ASM disk:
[ OK ]
[root@node1-pub
~]# /etc/init.d/oracleasm createdisk DSK2 /dev/sdc1
Marking
disk "/dev/sdc1" as an ASM disk:
[ OK ]
[root@node1-pub
~]# /etc/init.d/oracleasm createdisk DSK3 /dev/sdd1
Marking
disk "/dev/sdd1" as an ASM disk:
[
OK ]
[root@node1-pub
~]# /etc/init.d/oracleasm createdisk DSK4 /dev/sde1
Marking
disk "/dev/sde1" as an ASM disk:
[ OK ]
[root@node1-pub
~]# /etc/init.d/oracleasm scandisks
Scanning
system for ASM disks:
[ OK ]
[root@node1-pub
~]# /etc/init.d/oracleasm listdisks
DSK1
DSK2
DSK3
DSK4
[root@node1-pub
~]#
[root@node1-pub
~]# /etc/init.d/oracleasm status
Checking
if ASM is loaded:
[ OK ]
Checking
if /dev/oracleasm is mounted:
[ OK ]
[root@node1-pub
~]#
On the
other node, you only need to
execute the below command to show these disks up there.
[root@node2-pub
~]# /etc/init.d/oracleasm scandisks
[root@node2-pub ~]#
/etc/init.d/oracleasm listdisks
DSK1
DSK2
DSK3
DSK4
REFERENCES:
Oracle
Documents