Step By Step: Install and setup Oracle
11g R2 RAC on Oracle Enterprise Linux 5.5 (32 bit) Platform.
By Bhavin Hingu
This Document shows the step by step of installing and
setting up 3-Node 11gR2 RAC cluster. This setup uses IP Based iSCSI Openfiler
SAN as a shared storage subsystem. This setup does not have IPMI and Grid
Naming Service (GNS) configured. The SCAN is resolved through DNS.
Hardware Used in setting up
3-node 11g R2 RAC using iSCSI SAN (Openfiler):
· Total Machines: 5 (3 for RAC
nodes + 1 for NAS + 1 for DNS)
· Network Switches: 3 (for
Public, Private and Shared Storage)
· Extra Network Adaptors: 7 (6 for
RAC nodes (2 for each node) and one for Storage Server)
· Network cables: 11 (9 for RAC
nodes (3 for each node),
one for Shared Storage and 1 for DNS server)
· External USB HD: 1 (1 TB)
Machines Specifications:
DELL OPTIPLEX GX620
CPU: Intel 3800MHz
RAM: 4084MB
HD: 250GB
DVD, 10/100 NIC, 8 MB VRAM
Network Adaptor Specifications:
Linksys EG1032 Instant Gigabit
Network Adapter
Network Switch Specifications:
D-Link 24-Port Rackmountable Gigabit
Switch
Network Cables Specifications:
25-Foot Cat6 Snagless Patch Cable –
(Blue, Black and Grey)
Software Used for the 3-node RAC Setup using NAS (Openfiler):
· NAS Storage Solution: Openfiler
2.3 (2.6.26.8-1.0.11.smp.pae.gcc3.4.x86.i686)
· Operating System: Oracle
Enterprise Linux 5.5 (2.6.18-194.el5PAE)
· Clusterware: Oracle 11g R2 Grid
Infrastructure (11.2.0.1)
· Oracle RAC: Oracle RDBMS 11g R2
(11.2.0.1)
Operating
System: Oracle Enterprise Linux 5.5 (2.6.18-194.el5PAE):
Server:
All the RAC Nodes + DNS server
Grid
Infrastructure Software (Clusterware + ASM 11.2.0.1):
Server:
All the RAC Nodes
ORACLE_BASE:
/u01/app/grid
ORACLE_HOME: /u01/app/grid11201
Owner:
grid (Primary Group: oinstall, Secondary Group: asmadmin, asmdba)
Permissions:
755
OCR/Voting
Disk Storage Type: ASM
Oracle
Inventory Location: /u01/app/oraInventory
Oracle
Database Software (RAC 11.2.0.1):
Server:
All the RAC Nodes
ORACLE_BASE:
/u01/app/oracle
ORACLE_HOME:
/u01/app/oracle/db11201
Owner:
oracle (Primary Group: oinstall, Secondary Group: asmdba, dba)
Permissions:
755
Oracle
Inventory Location: /u01/app/oraInventory
Database
Name: labdb
Listener:
LAB_LISTENER (TCP:1525)
Openfiler
2.3:
Server:
single dedicated server acting as NAS.
OS:
Openfiler 2.3 (2.6.26.8-1.0.11.smp.pae.gcc3.4.x86.i686).
3-Node
RAC Architecture:
|
Machine |
Public Name |
Private Name |
VIP Name |
|
RAC Node1 |
node1.hingu.net |
node1-prv |
node1-vip.hingu.net |
|
RAC Node2 |
node2.hingu.net |
node2-prv |
node2-vip.hingu.net |
|
RAC Node3 |
node3.hingu.net |
node3-prv |
node3-vip.hingu.net |
|
Storage |
nas-server |
N/A |
N/A |
|
DNS server |
lab-dns |
N/A |
N/A |
SCAN IPs:
192.168.2.151
192.168.2.152
192.168.2.153
SCAN: lab-scan.hingu.net
Cluster Name: lab
Public Network: 192.168.2.0/eth2
Private network (cluster
Interconnect): 192.168.0.0/eth0
Private network (Storage
Network): 192.168.1.0/eth1
|
Machine |
Public IP |
Private IP |
VIP |
Storage IP |
|
RAC Node1 |
192.168.2.1 |
192.168.0.1 |
192.168.2.51 |
192.168.1.1 |
|
RAC Node2 |
192.168.2.2 |
192.168.0.2 |
192.168.2.52 |
192.168.1.2 |
|
RAC Node3 |
192.168.2.3 |
192.168.0.3 |
192.168.2.53 |
192.168.1.3 |
|
Storage |
N/A |
N/A |
N/A |
192.168.1.101 |
|
DNS server |
192.168.2.200 |
N/A |
N/A |
N/A |

The Installation is
divided into 3 main categories:
·
Installation
of Oracle 11g R2 Grid Infrastructure (11.2.0.1).
·
Installation of Oracle 11g R2
Real Application Cluster (RAC 11.2.0.1).
Hardware Used in this
exercise to setup 3-Node RAC
3-Node 11g R2 RAC
Architecture/Setup
Installation of Oracle
Enterprise Linux 5
Creating
Oracle Software owners/Groups/Permissions/HOMEs
Installation of
cvuqdisk Package
Setup of Network Time
Protocol
Setup Oracle Software
Owner’s Environment
Setting up SSH equivalency
for Oracle Software Owners
Configure
Shared Storage iSCSI disks using openfiler
Configure
the iSCSI disk Devices for Oracle ASM with ASMLib
·
Each node in the
Cluster must meet the below requirement.
·
At least 1024 x 768 display resolution, so that OUI displays correctly.
·
1 GB of space in the
/tmp directory
·
5.5 GB space for
Oracle Grid Infrastructure Home.
·
At least 2.5 GB of
RAM and equivalent swap space (for 32 bit installation as in my case).
·
All the RAC nodes
must share the same Instruction Set Architecture. For a testing RAC setup, it
is possible to install RAC on servers with mixtures of Intel 32 and AMD 32 with
differences in sizes of Memory/CPU speed.
Installation of OEL5.5 (On All the RAC Nodes
and DNS Host):
The below selection was made during the installation of
OEL5 on the Node 1 (node1.hingu.net). The same process was followed to install
RHEL 5 on all the remaining RAC nodes and DNS Host (lab-dns).
The Hostname/IP information was appropriately chosen for
respective nodes from the Architecture diagram.
Insert Installation Media #1:
Testing the
CD Media: Skip
Language:
English
Key Board:
U.S. English
Partition
Option: “Remove all Partitions on selected drives and create default layout”
Boot
Loader: “ The GRUB boot loader will be installed on
/dev/sda”
Network
Devices:
|
Active on Boot |
Devices |
IPV4.Netmask |
IPV6/Prefix |
|
|
|
|
|
|
Yes |
eth0 |
192.168.0.1/255.255.255.0 |
Auto |
|
Yes |
eth1 |
192.168.1.1/255.255.255.0 |
Auto |
|
Yes |
eth2 |
192.168.2.1/255.255.255.0 |
Auto |
Hostname à Manually à node1.hingu.net
Ignore
both the Warning Messages at this point
Region:
America/New York
System
Clock Uses UTC (checked)
Root
Password à Enter the root password
Additional
Tasks On top of Default Installation:
“Checked all Software Development” and “Web Server”
Customize
Now (Selected)
(Below is the extra selection on top of the
default selected packages)
Applications
à Authoring and Publishing (checked)
Development
à Development Libraries à
libstdc++44-devel
Development à Java Development
Development à Legacy Software
Development
Servers à Checked All the servers
Servers à Legacy Network Server à
bootparamd,
rsh-server, rusers, rusers-server, telnet-server
Servers à Network Servers à
dhcp, dhcpv6, dnsmasq, ypserv
Servers à Servers Configuration Tools à
Checked
All
Base
System àAdministration Tools à
Checked
All
Base
System à Base à
device-mapper-multipath, iscsi-initiator-utils,
Base
System à Legacy Software Support à
openmotif22
Base
System à System Tools à
OpenIPMI-gui,
lsscsi, oracle*, sysstat, tsclient
Post
Installation Steps:
(1) Yes to License Agreement.
(2) Disable the firewall
(3) Disable SELinux
(4) Disable kdump
(5) Set the clock
(6) Finish
Version:
Openfiler V 2.3 (downloaded from here)
This Install guide was followed to install
Openfiler with below values of Hostname and IP.
HOSTNAME:
nas-server
Network:
NAS IP: 192.168.1.101
NETMASK: 255.255.255.0
Post
installation Steps:
·
Disabled the Firewall using system-config-securitylevel-tui
·
Changed the password of the openfiler user
(default is password)
·
Connected to the nas-server using: https://192.168.1.101:446/ link.
·
Registered the cluster nodes in the “Network Access Configuration”
under the “System” tab.
·
‘Enable” all the services shown under the
‘Service” tab
System Setup Screen

Minimum Required RPMs for OEL 5.5 (All the 3 RAC Nodes):
binutils-2.17.50.0.6
compat-libstdc++-33-3.2.3
elfutils-libelf-0.125
elfutils-libelf-devel-0.125
elfutils-libelf-devel-static-0.125
gcc-4.1.2
gcc-c++-4.1.2
glibc-2.5-24
glibc-common-2.5
glibc-devel-2.5
glibc-headers-2.5
kernel-headers-2.6.18
ksh-20060214
libaio-0.3.106
libaio-devel-0.3.106
libgcc-4.1.2
libgomp-4.1.2
libstdc++-4.1.2
libstdc++-devel-4.1.2
make-3.81
numactl-devel-0.9.8.i386
sysstat-7.0.2
unixODBC-2.2.11
unixODBC-devel-2.2.11
Below
command verifies whether the specified rpms are installed or not. Any missing
rpms can be installed from the OEL Media Pack
rpm -q binutils
compat-libstdc++-33 elfutils-libelf elfutils-libelf-devel
elfutils-libelf-devel-static \
gcc gcc-c++ glibc glibc-common glibc-devel
glibc-headers kernel-headers ksh libaio libaio-devel \
libgcc libgomp libstdc++ libstdc++-devel make
numactl-devel sysstat unixODBC unixODBC-devel
I had to
install below extra RPMs.
numactl-devel à Located on the 3rd CD of OEL 5.5 Media pack.
oracleasmlib à
Available
here (one for RHEL compatible)
cvuqdisk à
Available on Grid Infrastructure Media
(under rpm folder)
[root@node1 ~]# rpm -ivh numactl-devel-0.9.8-11.el5.i386.rpm
warning:
numactl-devel-0.9.8-11.el5.i386.rpm: Header V3 DSA signature: NOKEY, key ID
1e5e0159
Preparing...
########################################### [100%]
1:numactl-devel
########################################### [100%]
[root@node1 ~]#
[root@node1 rpms]# rpm -ivh oracleasmlib-2.0.4-1.el5.i386.rpm
warning:
oracleasmlib-2.0.4-1.el5.i386.rpm: Header V3 DSA signature: NOKEY, key ID
1e5e0159
Preparing...
########################################### [100%]
1:oracleasmlib
########################################### [100%]
Network Configuration for RAC Nodes/NAS Server/DNS Host:
Public, VIPs and SCAN VIPs are resolved by DNS. The
private IPs for Cluster Interconnects are resolved
through /etc/hosts. The hostname along
with public/private and NAS network is configured at the time of OEL network
installations. The final Network Configurations files are listed here.
(a) hostname:
For Node
node1:
[root@node1 ~]# hostname node1.hingu.net
node1.hingu.net:
/etc/sysconfig/network
NETWORKING=yes
NETWORKING_IPV6=yes
HOSTNAME=node1.hingu.net
For Node
node2:
[root@node2 ~]# hostname node2.hingu.net
node2.hingu.net: /etc/sysconfig/network
NETWORKING=yes
NETWORKING_IPV6=yes
HOSTNAME=node2.hingu.net
For Node
node3:
[root@node3 ~]# hostname node3.hingu.net
node3.hingu.net: /etc/sysconfig/network
NETWORKING=yes
NETWORKING_IPV6=yes
HOSTNAME=node3.hingu.net
For Node
nas-server:
[root@nas-server ~]# hostname nas-server
nas-server: /etc/sysconfig/network
NETWORKING=yes
HOSTNAME=nas-server
For Node
lab-dns:
[root@lab-dns ~]# hostname lab-dns
lab-dns.hingu.net: /etc/sysconfig/network
NETWORKING=yes
NETWORKING_IPV6=yes
HOSTNAME=nas-server
(b)
Private Network for Cluster Interconnect:
node1.hingu.net:
/etc/sysconfig/network-scripts/ifcfg-eth0
# Linksys Gigabit Network Adapter
DEVICE=eth0
BOOTPROTO=static
BROADCAST=192.168.0.255
HWADDR=00:22:6B:BF:4E:60
IPADDR=192.168.0.1
IPV6INIT=yes
IPV6_AUTOCONF=yes
NETMASK=255.255.255.0
NETWORK=192.168.0.0
ONBOOT=yes
node2.hingu.net:
/etc/sysconfig/network-scripts/ifcfg-eth0
# Linksys Gigabit Network Adapter
DEVICE=eth0
BOOTPROTO=static
BROADCAST=192.168.0.255
HWADDR=00:22:6B:BF:4E:4B
IPADDR=192.168.0.2
IPV6INIT=yes
IPV6_AUTOCONF=yes
NETMASK=255.255.255.0
NETWORK=192.168.0.0
ONBOOT=yes
node3.hingu.net:
/etc/sysconfig/network-scripts/ifcfg-eth0
# Linksys Gigabit Network Adapter
DEVICE=eth0
BOOTPROTO=static
BROADCAST=192.168.0.255
HWADDR=00:22:6B:BF:4E:49
IPADDR=192.168.0.3
IPV6INIT=yes
IPV6_AUTOCONF=yes
NETMASK=255.255.255.0
NETWORK=192.168.0.0
ONBOOT=yes
(c) Public
Network:
node1.hingu.net:
/etc/sysconfig/network-scripts/ifcfg-eth2
# Broadcom Corporation NetXtreme BCM5751
Gigabit Ethernet PCI Express
DEVICE=eth2
BOOTPROTO=static
BROADCAST=192.168.2.255
HWADDR=00:18:8B:04:6A:62
IPADDR=192.168.2.1
IPV6INIT=yes
IPV6_AUTOCONF=yes
NETMASK=255.255.255.0
NETWORK=192.168.2.0
ONBOOT=yes
node2.hingu.net:
/etc/sysconfig/network-scripts/ifcfg-eth2
# Broadcom Corporation NetXtreme BCM5751
Gigabit Ethernet PCI Express
DEVICE=eth2
BOOTPROTO=static
BROADCAST=192.168.2.255
HWADDR=00:18:8B:24:F8:58
IPADDR=192.168.2.2
IPV6INIT=yes
IPV6_AUTOCONF=yes
NETMASK=255.255.255.0
NETWORK=192.168.2.0
ONBOOT=yes
node3.hingu.net:
/etc/sysconfig/network-scripts/ifcfg-eth2
# Broadcom Corporation NetXtreme BCM5751
Gigabit Ethernet PCI Express
DEVICE=eth2
BOOTPROTO=static
BROADCAST=192.168.2.255
HWADDR=00:19:B9:0C:E6:EF
IPADDR=192.168.2.3
IPV6INIT=yes
IPV6_AUTOCONF=yes
NETMASK=255.255.255.0
NETWORK=192.168.2.0
ONBOOT=yes
lab-dns.hingu.net: /etc/sysconfig/network-scripts/ifcfg-eth0
# Broadcom Corporation NetXtreme BCM5751
Gigabit Ethernet PCI Express
DEVICE=eth0
BOOTPROTO=static
BROADCAST=192.168.2.255
HWADDR=00:13:72:A1:E9:1B
IPADDR=192.168.2.200
NETMASK=255.255.255.0
NETWORK=192.168.2.0
ONBOOT=yes
(d) Private
Network for Shared Storage:
node1.hingu.net:
/etc/sysconfig/network-scripts/ifcfg-eth1
# Linksys Gigabit Network Adapter
DEVICE=eth1
BOOTPROTO=static
BROADCAST=192.168.1.255
HWADDR=00:22:6B:BF:4E:60
IPADDR=192.168.1.1
IPV6INIT=yes
IPV6_AUTOCONF=yes
NETMASK=255.255.255.0
NETWORK=192.168.1.0
ONBOOT=yes
node2.hingu.net:
/etc/sysconfig/network-scripts/ifcfg-eth1
# Linksys Gigabit Network Adapter
DEVICE=eth1
BOOTPROTO=static
BROADCAST=192.168.1.255
HWADDR=00:22:6B:BF:45:13
IPADDR=192.168.1.2
IPV6INIT=yes
IPV6_AUTOCONF=yes
NETMASK=255.255.255.0
NETWORK=192.168.1.0
ONBOOT=yes
node3.hingu.net:
/etc/sysconfig/network-scripts/ifcfg-eth1
# Linksys Gigabit Network Adapter
DEVICE=eth1
BOOTPROTO=static
BROADCAST=192.168.1.255
HWADDR=00:22:6B:BF:4E:48
IPADDR=192.168.1.3
IPV6INIT=yes
IPV6_AUTOCONF=yes
NETMASK=255.255.255.0
NETWORK=192.168.1.0
ONBOOT=yes
nas-server.hingu.net: /etc/sysconfig/network-scripts/ifcfg-eth1
DEVICE=eth1
BOOTPROTO=static
BROADCAST=192.168.1.255
HWADDR=00:22:6B:BF:43:D6
IPADDR=192.168.1.101
NETMASK=255.255.255.0
NETWORK=192.168.1.0
ONBOOT=yes
TYPE=Ethernet
(e) /etc/hosts files:
node1.hingu.net: /etc/hosts
# # Do not
remove the following line, or various programs
# that require network
functionality will fail.
127.0.0.1 node1.hingu.net node1 localhost.localdomain localhost
::1 localhost6.localdomain6 localhost6
##=======================================
# Private Network for Cluster Interconnect
##=======================================
192.168.0.1 node1-prv
192.168.0.2 node2-prv
192.168.0.3 node3-prv
##=======================================
##=======================================
node2.hingu.net:
/etc/hosts
# # Do not
remove the following line, or various programs
# that require network
functionality will fail.
127.0.0.1 node2.hingu.net node2 localhost.localdomain localhost
::1 localhost6.localdomain6 localhost6
##=======================================
# Private Network for Cluster Interconnect
##=======================================
192.168.0.1 node1-prv
192.168.0.2 node2-prv
192.168.0.3 node3-prv
##=======================================
##=======================================
node3.hingu.net: /etc/hosts
# # Do not
remove the following line, or various programs
# that require network
functionality will fail.
127.0.0.1 node3.hingu.net node3 localhost.localdomain localhost
::1 localhost6.localdomain6 localhost6
##=======================================
# Private Network for Cluster Interconnect
##=======================================
192.168.0.1 node1-prv
192.168.0.2
node2-prv
192.168.0.3 node3-prv
##=======================================
##=======================================
lab-dns.hingu.net: /etc/hosts
# # Do not remove the
following line, or various programs
# that require network
functionality will fail.
127.0.0.1 lab-dns.hingu.net
lab-dns localhost.localdomain localhost
::1 localhost6.localdomain6 localhost6
Configure
DNS server for SCAN VIPs, Node VIPs and Node IPs:
DNS Server:
lab-dns.hingu.net
RPMs required
in setting up DNS server:
ypbind-1.19-12.el5
bind-utils-9.3.6-4.P1.el5_4.2
bind-9.3.6-4.P1.el5_4.2
system-config-bind-4.0.3-4.0.1.el5
bind-libs-9.3.6-4.P1.el5_4.2
bind-chroot-9.3.6-4.P1.el5_4.2
Configurations
files modified/created to set up DNS:
lab-dbs.hingu.net
/var/named/chroot/etc/named.conf
(modified)
/var/named/chroot/var/named/hingu.net.zone
(created)
/var/named/chroot/var/named/2.168.192.in-addr.arpa.zone
(created)
/var/named/chroot/var/named/1.168.192.in-addr.arpa.zone
(created)
On node1, node2 and node3
/etc/resolv.conf
(modified)
/var/named/chroot/etc/named.conf
// Enterprise Linux BIND Configuration Tool
//
// Default initial "Caching Only" name server configuration
//
options {
directory "/var/named";
dump-file "/var/named/data/cache_dump.db";
statistics-file "/var/named/data/named_stats.txt";
};
// Zone for this RAC configuration is hingu.net
zone
"hingu.net" in {
type master;
file "hingu.net.zone";
allow-update { none; };
};
// For reverse lookups
zone
"2.168.192.in-addr.arpa" in {
type master;
file "2.168.192.in-addr.arpa.zone";
allow-update { none; };
};
zone
"1.168.192.in-addr.arpa" in {
type master;
file "1.168.192.in-addr.arpa.zone";
allow-update { none; };
};
include "/etc/rndc.key";
/var/named/chroot/var/named/hingu.net.zone
$TTL
1d
hingu.net. IN
SOA lab-dns.hingu.net. root.hingu.net. (
100 ; se = serial number
8h ; ref = refresh
5m ; ret = update retry
3w ; ex = expiry
3h ; min = minimum
)
IN NS lab-dns.hingu.net.
; DNS server
lab-dns IN
A 192.168.2.200
; RAC Nodes Public name
node1 IN
A 192.168.2.1
node2 IN
A 192.168.2.2
node3 IN
A 192.168.2.3
; RAC Nodes Public VIPs
node1-vip IN
A 192.168.2.51
node2-vip IN
A 192.168.2.52
node3-vip IN
A 192.168.2.53
; 3 SCAN VIPs
lab-scan IN
A 192.168.2.151
lab-scan IN
A 192.168.2.152
lab-scan IN
A 192.168.2.153
; Storage Network
nas-server IN A
192.168.1.101
node1-nas IN
A 192.168.1.1
node2-nas IN
A 192.168.1.2
node3-nas IN
A 192.168.1.3
/var/named/chroot/var/named/2.168.192.in-addr.arpa.zone
$TTL
1d
@
IN SOA lab-dns.hingu.net. root.hingu.net.
(
100 ; se = serial number
8h ; ref = refresh
5m ; ret = update retry
3w ; ex = expiry
3h ; min = minimum
)
IN NS lab-dns.hingu.net.
; DNS machine name in reverse
200
IN PTR lab-dns.hingu.net.
; RAC Nodes Public Name in Reverse
1
IN PTR node1.hingu.net.
2
IN PTR node2.hingu.net.
3
IN PTR node3.hingu.net.
; RAC Nodes Public VIPs in Reverse
51
IN PTR node1-vip.hingu.net.
52
IN PTR node2-vip.hingu.net.
53
IN PTR node3-vip.hingu.net.
; RAC Nodes SCAN VIPs in Reverse
151
IN PTR lab-scan.hingu.net.
152
IN PTR lab-scan.hingu.net.
153
IN PTR lab-scan.hingu.net.
/var/named/chroot/var/named/1.168.192.in-addr.arpa.zone
$TTL
1d
@
IN SOA lab-dns.hingu.net. root.hingu.net.
(
100 ; se = serial number
8h ; ref = refresh
5m ; ret = update retry
3w ; ex = expiry
3h ; min = minimum
)
IN NS lab-dns.hingu.net.
; Storage Network Reverse Lookup
101
IN PTR nas-server.hingu.net.
1
IN PTR node1-nas.hingu.net.
2
IN PTR node2-nas.hingu.net.
3
IN PTR node3-nas.hingu.net.
/etc/resolv.conf (on
RAC nodes):
search hingu.net
nameserver
192.168.2.200
Start
the DNS Service (named):
service named
start
chkconfig --level 35
named on
Verify
the DNS Setup:

NOTE:
nslookup for lab-scan should return names in random order every time.
Enable Name Service
Cache Daemon nscd: (On all the RAC
Nodes)
chkconfig --level 35
nscd on
service ncsd start
Creating Oracle Users/Groups/Permissions and
Installation Paths: (On all the RAC Nodes):
userdel oracle
groupdel oinstall
groupdel dba
groupadd -g 1000
oinstall
groupadd -g 1020
asmadmin
groupadd -g 1021 asmdba
groupadd -g 1031
dba
useradd -u 1100 -g
oinstall -G asmadmin,asmdba grid
useradd -u 1101 -g
oinstall -G dba,asmdba oracle
mkdir -p
/u01/app/grid11201
mkdir -p
/u01/app/grid
chown -R
grid:oinstall /u01
mkdir -p
/u01/app/oracle
chown
oracle:oinstall /u01/app/oracle
chmod -R 775
/u01
passwd grid
passwd oracle
Install cvuqdisk Package: (On all the RAC Nodes):
This package is located in the rpm directory on Grid
Infrastructure Media and needs to be installed after the group oinstall is created. In my case, as this was a fresh install of
11g R2 on new hardware, old versions of cvuqdisk was not present. If it is,
then the older version needs to be removed first.
export CVUQDISK_GRP=oinstall
echo $CVUQDISK
rpm –ivh cvuqdisk-1.0.7-1.rpm
[root@node1 rpm]# pwd
/home/grid/11gR2_for_OEL5/grid11201/grid/rpm
[root@node1 rpm]# export CVUQDISK_GRP=oinstall
[root@node1 rpm]# echo $CVUQDISK_GRP
oinstall
[root@node1 rpm]# rpm -ivh cvuqdisk-1.0.7-1.rpm
Preparing...
########################################### [100%]
1:cvuqdisk
########################################### [100%]
[root@node1 rpm]# rpm -qa | grep cvuqdisk
cvuqdisk-1.0.7-1
[root@node1 rpm]#
Network
Time Protocol Setting (On all the RAC Nodes):
In this installation, Oracle Time Synchronization Service
is used over the Linux system provided ntpd. So, it needs to
deactivated and deinstalled to avoid any possibility of it being conflicted
with the Oracle’s Cluster Time Sync Service (ctss).
# /sbin/service ntpd
stop
# chkconfig
ntpd off
# mv
/etc/ntp.conf /etc/ntp.conf.org
Also remove the
following file:
/var/run/ntpd.pid
Configure Grid Infrastructure as well as Oracle RAC Owner’s User
Environment (grid and oracle):
(a) Set the umask
to 022 by putting below line into these users’ (grid and oracle) .bash_profile
files:
umask 022
Then, executed the .bash_profile and verified
that the correct value of umask is displayed.
[grid@node1 ~]$ . .bash_profile
[grid@node1 ~]$ umask
(b) Setting up X11
forwarding:
Created
the file ~/.ssh/config to disable the X11Forwadding by placing below line in it.
Host *
ForwardX11 no
(c) Suppressed
the Terminal output on STDOUT and STDERR to prevent Installation errors:
Modified
the file ~/.bashrc (or .cshrc for C shell)
with below entry.
Bourne, Bash, or Korn
shell:
if [ -t 0 ]; then
stty intr
^C
fi
C shell:
test -t 0
if
($status == 0) then
stty intr
^C
endif
(d) Increased the
Shell Limits:
Recommended:
|
Resource |
Soft Limit |
Hard Limit |
|
Processes |
2047 |
16384 |
|
Open File
Descriptors |
1024 |
65536 |
|
Stack |
10240 |
10240 - 32768 |
Set:
|
Resource |
Soft Limit |
Hard Limit |
|
Processes |
131072 |
131072 |
|
Open File
Descriptors |
131072 |
131072 |
|
Stack |
32768 |
32768 |
Added the following
lines to the /etc/security/limits.conf file:
oracle
soft nofile 131072
oracle
hard nofile 131072
oracle
soft nproc 131072
oracle
hard nproc 131072
oracle
soft core unlimited
oracle
hard core unlimited
oracle
soft memlock 3500000
oracle
hard memlock 3500000
# Recommended stack hard limit 32MB for oracle installations
# oracle hard stack
32768
grid soft nofile
131072
grid hard nofile
131072
grid soft nproc
131072
grid hard nproc
131072
grid soft core
unlimited
grid hard core
unlimited
grid soft memlock
3500000
grid hard memlock
3500000
# Recommended stack hard limit 32MB for grid installations
# grid hard stack
32768
Added the following
line in the /etc/pam.d/login file, if it does not already exist:
session required /lib/security/pam_limits.so
For the Bourne, Bash,
or Korn shell, add
the following lines to the /etc/profile:
if [ $USER =
"oracle" ]; then
if [ $SHELL
= "/bin/ksh" ]; then
ulimit
-p 131072
ulimit
-n 131072
else
ulimit
-u 131072 -n 131072
fi
fi
if [ $USER =
"grid" ]; then
if [ $SHELL
= "/bin/ksh" ]; then
ulimit
-p 131072
ulimit
-n 131072
else
ulimit
-u 131072 -n 131072
fi
fi
For the C shell (csh or
tcsh), add the following lines to the /etc/csh.login.
if ( $USER ==
"oracle" ) then
limit
maxproc 131072
limit
descriptors 131072
endif
if ( $USER == "grid" ) then
limit
maxproc 131072
limit
descriptors 131072
endif
(e) Set the below Kernel
Parameters with recommended range in /etc/sysctl.conf
This was already set
with the installation of oracle-validated package.
/etc/sysctl.conf
# Kernel
sysctl configuration file for Oracle Enterprise Linux
#
# For binary values, 0 is disabled,
1 is enabled. See sysctl(8)
and
# sysctl.conf(5) for more
details.
# Controls IP packet forwarding
net.ipv4.ip_forward = 0
# Controls source route verification
net.ipv4.conf.default.rp_filter = 1
# Do not accept source
routing
net.ipv4.conf.default.accept_source_route = 0
# Controls the System Request debugging
functionality of the kernel
kernel.sysrq = 1
# Controls whether core dumps will append the PID to
the core filename
# Useful for debugging multi-threaded applications
kernel.core_uses_pid = 1
# Controls the use of TCP syncookies
net.ipv4.tcp_syncookies = 1
# Controls the maximum size of a message, in bytes
kernel.msgmnb = 65536
# Controls the default maxmimum size of a mesage
queue
kernel.msgmax = 8192
# Controls the maximum shared segment size, in bytes
kernel.shmmax = 4294967295
# Controls the maximum number of shared memory
segments, in pages
kernel.shmall = 1073741824
# For 11g, recommended
value for file-max is 6815744
fs.file-max = 6815744
# For 10g, uncomment
'fs.file-max 327679', comment other entries for this parameter and re-run
sysctl -p
# fs.file-max:327679
kernel.msgmni = 2878
kernel.sem = 250 32000 100 142
kernel.shmmni = 4096
net.core.rmem_default = 262144
# For 11g, recommended
value for net.core.rmem_max is 4194304
net.core.rmem_max = 4194304
# For 10g, uncomment
'net.core.rmem_max 2097152', comment other entries for this parameter and
re-run sysctl -p
# net.core.rmem_max=2097152
net.core.wmem_default = 262144
# For 11g, recommended value
for wmem_max is 1048576
net.core.wmem_max = 1048576
# For 10g, uncomment
'net.core.wmem_max 262144', comment other entries for this parameter and re-run
sysctl -p
# net.core.wmem_max:262144
fs.aio-max-nr = 3145728
# For 11g, recommended
value for ip_local_port_range is 9000 65500
net.ipv4.ip_local_port_range = 9000 65500
# For 10g, uncomment
'net.ipv4.ip_local_port_range 1024 65000', comment other entries for this
parameter and re-run sysctl -p
# net.ipv4.ip_local_port_range:1024 65000
# Added min_free_kbytes
50MB to avoid OOM killer on EL4/EL5
vm.min_free_kbytes = 51200
(f) Repeated
this process for all the remaining nodes in the cluster.
SSH
user Equivalency configuration (grid and oracle):
On All
the Cluster Nodes:
su
- oracle
mkdir
~/.ssh
chmod
700 ~/.ssh
Generate the RSA and DSA keys:
/usr/bin/ssh-keygen
-t rsa
/usr/bin/ssh-keygen
-t dsa
On node1:
touch
~/.ssh/authorized_keys
cd
~/.ssh
(a) Add these
Keys to the Authorized_keys file.
cat id_rsa.pub >> authorized_keys
cat id_dsa.pub >> authorized_keys
(b) Send this file
to node2.
scp authorized_keys node2:.ssh/
On node2:
(a) Add these
Keys to the Authorized_keys file.
cd ~/.ssh
cat id_rsa.pub >> authorized_keys
cat id_dsa.pub >> authorized_keys
(b) Send this file
to node3.
scp authorized_keys node3:.ssh/
On node3:
(a) Add these
Keys to the Authorized_keys file.
cd ~/.ssh
cat id_rsa.pub >> authorized_keys
cat id_dsa.pub >> authorized_keys
(b) Send this file
to node1 and node2.
scp authorized_keys node1:.ssh/
scp authorized_keys node2:.ssh/
On All the Nodes:
chmod 600 ~/.ssh/authorized_keys
ssh node1 date
ssh node2 date
ssh node3 date
ssh node1.hingu.net date
ssh node2.hingu.net date
ssh node3.hingu.net date
ssh node1-prv date
ssh node2-prv date
ssh node3-prv date
Entered
'yes' and continued when prompted
Repeat the Above process for user grid:
Configure the Shared Storage for 11g R2 Grid
Infrastructure and RAC Database:
Volume
Group: grid
Physical
Volume: /dev/sda5 (1st
extended partition on the last physical partition of local disk /dev/sda
nas-server)
Logical
Volumes: asmdisk01, asmdisk02, asmdisk03
a)
Connect to the
nas-server using: https://192.168.1.101:446 using
openfiler<password>
b)
Create the Volume
group “grid” and created the two logical volumes asmdisk01 and asmdisk02 for
ASM.
c)
Assign iSCSI targets
to these LUNs so that they can be discovered by the clients (cluster nodes node1, node2 and node3)
Here is the
process I followed to create the 3rd logical volume called
asmdisk03.
Steps to
Create 3rd volume asmdisk03 of size 25GB.
(1) Clicked on ‘Add Volumes” link under the “Volumes” tab.
(2) Filled the appropriate values and press “create”
(3) The 3rd Volume asmdisk03 was created.
(4) Assigned the iscsi-target to this newly created volume.
(a) Clicked on “iSCSI-Targets” line under the “Volumes” tab.
(b) Under the “Target Configuration” sub tab, entered the
Value of asmdisk03 in the “Target IQN” box and then clicked “Add” as shown in
the screen.
(c) Clicked on the “update” on the same screen with all the
default values selected.
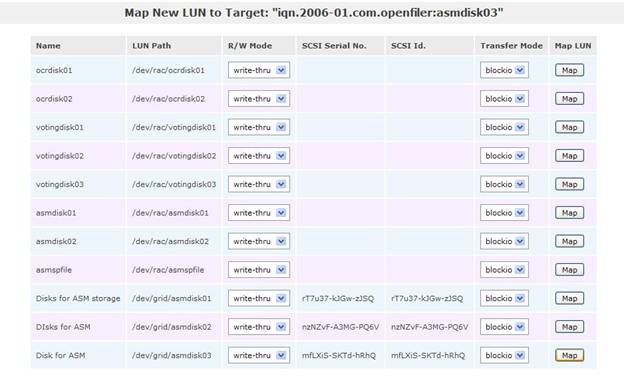
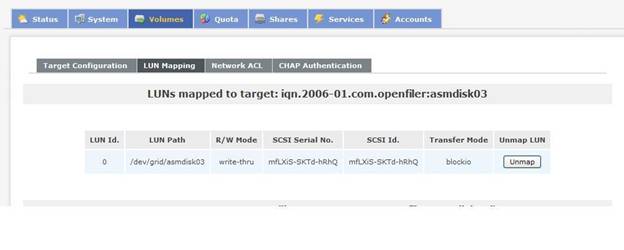
(d) Went to the “LUN Mapping” sub tab where the iscsi-target
is assigned to the new Logical Volume created (asmdisk03)
(e) Clicked the “map” for the volume asmdisk03.
(f)
Went to the “Network ACL” tab and allow all
the 3 rac nodes to have access on this iscsi-target.
(5) Restarted the iscsi-target on the NAS (service
iscsi-target restart)
(6) Restarted the iscsi service and make it start automatic during the
restart of system (On All the RAC Nodes):
chkconfig --level 35 iscsi on
service iscsi restart
(7) Manually discovered the new lun and make them discover
automatic at every startup of iscsi. This set of commands is required for every
luns to be discovered on RAC nodes. I am showing it only for asmdisk03 here.
(On All the RAC Nodes):
iscsiadm -m discovery -t
sendtargets -p 192.168.1.101
iscsiadm -m node -T
iqn.2006-01.com.openfiler:asmdisk03 -p 192.168.1.101 –l
iscsiadm -m node -T
iqn.2006-01.com.openfiler:asmdisk03 -p 192.168.1.101 --op update -n
node.startup -v automatic
Configuration
Files:
/etc/sysconfig/network
(nas-server)
NETWORKING=yes
HOSTNAME=nas-server
/etc/sysconfig/network-scripts/ifcfg-eth1
(nas-server):
DEVICE=eth1
BOOTPROTO=static
BROADCAST=192.168.1.255
HWADDR=00:22:6B:BF:43:D6
IPADDR=192.168.1.101
NETMASK=255.255.255.0
NETWORK=192.168.1.0
ONBOOT=yes
TYPE=Ethernet
/etc/rc.local
(nas-server)
vgchange
-ay
service
iscsi-target restart
The
screenshots of the above process:

The 3rd
Volume created.

Assigning the iSCSI Target iqn to lun asmdisk03.


Setting
up Device Name Persistency: (On all the RAC nodes)
Because
OCR and Voting disks are residing on ASM, this setup is no longer required
unless these files are stored outside of ASM. In this Installation, the OCR and
Voting Files are stored on ASM.
Configure the iSCSI disk Devises for Oracle ASM with
ASMLib:
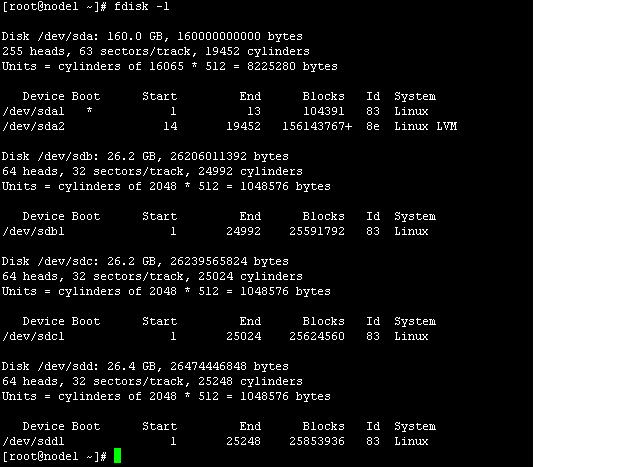
(a) Partition the Disk Devises (only from one node): Format
these disks to contain a single primary partition to represent it at the time
of creating ASM disk using oracleasm.
[root@node1 ~]# fdisk /dev/sdb
The number of cylinders
for this disk is set to 24992.
There is nothing
wrong with that, but this is larger than 1024,
and
could in certain setups cause problems with:
1) software
that runs at boot time (e.g., old versions of LILO)
2) booting
and partitioning software from other OSs
(e.g., DOS FDISK, OS/2 FDISK)
Command (m for help):
n
Command action
e extended
p primary partition (1-4)
p
Partition number
(1-4): 1
First cylinder
(1-24992, default 1):
Using default value 1
Last cylinder or +size
or +sizeM or +sizeK (1-24992, default 24992):
Using default value
24992
Command (m for help):
p
Disk /dev/sdb: 26.2
GB, 26206011392 bytes
64 heads, 32
sectors/track, 24992 cylinders
Units = cylinders of
2048 * 512 = 1048576 bytes
Device Boot
Start End Blocks
Id System
/dev/sdb1 1 24992
25591792 83 Linux
Command (m for help):
w
The partition table
has been altered!
Calling ioctl() to re-read partition table.
Syncing
disks.
[root@node1 ~]# fdisk /dev/sdc
The number of
cylinders for this disk is set to 25024.
There is nothing
wrong with that, but this is larger than 1024,
and
could in certain setups cause problems with:
1) software
that runs at boot time (e.g., old versions of LILO)
2) booting
and partitioning software from other OSs
(e.g., DOS FDISK, OS/2 FDISK)
Command (m for help):
n
Command action
e extended
p primary partition (1-4)
p
Partition number
(1-4): 1
First cylinder
(1-25024, default 1):
Using default value 1
Last cylinder or
+size or +sizeM or +sizeK (1-25024, default 25024):
Using default value
25024
Command (m for help):
p
Disk /dev/sdc: 26.2
GB, 26239565824 bytes
64 heads, 32
sectors/track, 25024 cylinders
Units = cylinders of
2048 * 512 = 1048576 bytes
Device Boot Start End Blocks
Id System
/dev/sdc1 1 25024
25624560 83 Linux
Command (m for help):
w
The partition table
has been altered!
Calling ioctl() to re-read partition table.
Syncing
disks.
[root@node1 ~]# fdisk /dev/sdd
The number of
cylinders for this disk is set to 25248.
There is nothing
wrong with that, but this is larger than 1024,
and
could in certain setups cause problems with:
1) software
that runs at boot time (e.g., old versions of LILO)
2) booting
and partitioning software from other OSs
(e.g., DOS FDISK, OS/2 FDISK)
Command (m for help):
n
Command action
e extended
p primary partition (1-4)
p
Partition number
(1-4): 1
First cylinder
(1-25248, default 1):
Using default value 1
Last cylinder or
+size or +sizeM or +sizeK (1-25248, default 25248):
Using default value
25248
Command (m for help):
p
Disk /dev/sdd: 26.4
GB, 26474446848 bytes
64 heads, 32
sectors/track, 25248 cylinders
Units = cylinders of
2048 * 512 = 1048576 bytes
Device Boot Start End Blocks
Id System
/dev/sdd1 1 25248
25853936 83 Linux
Command (m for help):
w
The partition table
has been altered!
Calling ioctl() to re-read partition table.
Syncing
disks.
[root@node1 ~]#
(b) Refreshed the kernel on the remaining nodes with the
latest partition table using partprobe.
[root@node1 ~]# partprobe
(c) Verified that the below RPMs are installed before
configuring the ASM driver.
oracleasm-2.6.18-194.el5-2.0.5-1.el5
oracleasm-support-2.1.3-1.el5
oracleasm-2.6.18-194.el5xen-2.0.5-1.el5
oracleasm-2.6.18-194.el5PAE-2.0.5-1.el5
oracleasm-2.6.18-194.el5debug-2.0.5-1.el5
oracleasmlib-2.0.4-1.el5
(d) Configured the ASMLib (All the RAC nodes):
[root@node1 ~]# oracleasm configure –i

(e) Loaded the ASMLib Module (All the RAC nodes):
[root@node1 ~]# oracleasm
init
(f) Created
the ASM disks using oracleasm: (ONLY from one of the RAC nodes)
oracleasm createdisk DSK01 /dev/sdb1
oracleasm createdisk DSK02 /dev/sdc1
oracleasm createdisk DSK03 /dev/sdd1
oracleasm scandisks
oracleasm listdisks

(g) On the Remaining RAC nodes, simply scanned the ASM disks
to instantiate these newly created disks
oracleasm scandisks
oracleasm listdisks
(h) Verified that these ASM disk can be discovered by ASM Libraries
(oracleasmlib) on all the RAC Nodes during Installation of Grid Infrastructure.
/usr/sbin/oracleasm-discover
'ORCL:*'
[grid@node1
~]$ /usr/sbin/oracleasm-discover 'ORCL:*'
Using
ASMLib from /opt/oracle/extapi/32/asm/orcl/1/libasm.so
[ASM
Library - Generic Linux, version 2.0.4 (KABI_V2)]
Discovered
disk: ORCL:DSK01 [51183584 blocks (26205995008 bytes),
maxio 512]
Discovered
disk: ORCL:DSK02 [51249120 blocks (26239549440 bytes),
maxio 512]
Discovered
disk: ORCL:DSK03 [51707872 blocks (26474430464 bytes),
maxio 512]
[grid@node1
~]$
With this, the pre-Installation steps
are completed successfully and are ready to install 11g R2 Grid Infrastructure
software Next.