 |
Pre-Installation tasks
of Installing Oracle 9iR2 Real Application Cluster (RAC)
(9.2.0.1) 32-bit on
RedHat AS 3 x86 (RHEL3) / CentOS
3 x86
By Bhavin Hingu
|
Pre-Installation
Task:
Task
List:
Required
Hardware:
To
create 2-node RAC, one would requre 2 machine with the following
hardware installed on it.
Per Node:
512MB RAM, at least 6 GB of harddrive, 1 GHz CPU,
1 Firewire Controller, 1 Firewire Cable
2 NIC ethernet card (one for public and another for private /
interconnect network)
Per Cluster:
1 Shared Harddrive
1 firewire HUB + 1 firewire cable (for cluster with more than 2 node)
1 Network HUB + 1 network cable (for
cluster with more than 2 node)
1 crossover network cable (for cluster with 2 node)
n number of network cable for private network
for internode communication (for cluster with n nodes where n >=3)
n number of network
cable for public network (for cluster with n nodes where n
>=3)
I
used the below hardware to build my 2-node rac.
| Server 1 |
Dell Intel PIII 1.3 GHz, 256 MB RAM, 20 GB HD |
$200 - Used one
|
| Server 2 |
Dell Intel PIII 1.3
GHz, 256 MB RAM, 20 GB HD |
$200 - Used one |
Upgrade Memory to 512MB
|
256 MB x 2 for Both the Server |
$110 |
| Firewire Hard Drive |
LaCie Firewire Hard Drive 120 GB |
$160 |
| Firewire Controllers |
adaptec AFW-4300 x 2 (for both the server) - Texas
Instrument chipset
|
$98 |
Firewire HUB
|
Belkin's Firewire 6-Port Hub
|
$55
|
| Firewire Cables |
1 extra firewire cable for other node |
$15 |
| NICs |
D-Link Ethernet card x2 |
$30 |
Network Hub
|
"NETWORK Everywhere"10/100
5-Port Hub
|
$30
|
| Crossover cable |
-------
|
$15 |
Total Cost : $913.00
Technical
Architecture of 2 node RAC:
Clustered Database Name: RacDB
Node1:
SID: RacDB1
Public Network name (hostname): node1-pub, eth0
Private network Name (for Interconnect): node1-prv, eth1
ORACLE_BASE: /u01/app/oracle
DB file location: /u02/oradata/raw --
using raw device as a storage option for clustered database
DB file location: /u02/oradata/ocfs --
Using ocfs as a storage option for clustered database
Node2:
SID: RacDB2
Public Network name (hostname): node2-pub, eth0
Private network Name (for Interconnect): node2-prv, eth1
ORACLE_BASE: /u01/app/oracle
DB file location: /u02/oradata/raw -- for
raw device as a storage option for clustered database
DB file location: /u02/oradata/ocfs --
for ocfs as a storage option for clustered database
Shared File Location:
Quorum Disk File: /u02/oradata/ocfs/QuorumFile
Shared Config File:
/u02/oradata/ocfs/SharedConfigFile
Obtaining Oracle 9iR2
RDBMS Software:
Goto
otn.oracle.com and download the appropriate Oracle 9iR2 Software into
the /tmp. Make Sure You have enough
space under this mount point. You
can check this using df command. I downloaded following 3 files from
OTN for my 32-bit Linux box
under the /tmp directory. Oracle supplies the Clusterware software as
part of the Regular 9i RDBMS software by default for Linux.
So you do not need to ownload it like we do in case of 10g.
lnx_920_Disk[1 2 3].cpio.gz
It is more advisable to download
lnx_9204_disk[1 2
3].cpio.gz in stead of the above files (9.2.0.1) so that you do not
need to
download p3095277_9204_LINUX.zip
which is required to upgrade 9.2.0.1 to 9.2.0.4. Also you do not
need to download patch 3119415_9204_LINUX.zip
that is required to fix
the linking error during the installation of
intelligent agent file:
ins_oemagent.mk
I, then, used the below series of
commands for each disk to unzip and uncompress it.
cd /tmp
gunzip lnx_920_Disk1.cpio.gz
cpio -idmv < lnx_920_Disk1.cpio
This will create 3 directory
under /tmp named Disk1, Disk2 and Disk3. Optionally, you can write them
on the CD.
[root@localhost tmp]# mkisofs
-r Disk1 | cdrecord -v dev=1,1,0
speed=20 -
After you install the Linux system and before
you start installing Oracle10g software, please make sure that you have
the below
packages installed on your Linux box, else
you will get error(s) during the
installation
process.
make-3.79.1
gcc-3.2.3-34
glibc-2.3.2-95.20
compat-db-4.0.14-5
compat-gcc-7.3-2.96.128
compat-gcc-c++-7.3-2.96.128
compat-libstdc++-7.3-2.96.128
compat-libstdc++-devel-7.3-2.96.128
openmotif21-2.1.30-8
setarch-1.3-1
libaio-0.3.103-3
ncurses4-5.0-9
pdksh-5.2.14-21
- Please execute the below comand as root to make sure that you
have this rpms installed. If not installed, then download them
- from appropriate linux site.
- rpm -q make gcc glibc
compat-db compat-gcc
compat-gcc-c++
compat-libstdc++
\
compat-libstdc++-devel
openmotif21 setarch libaio libaio-devel pdksh ncurses4
Perform this step on
all the nodes.
Oracle
9i RAC requires to have 512 of RAM available on each node to
sucessfully install 9i RAC. Well, You will get warning
during
checking of pre-requise step of installation step if you do not have
required memorywhich you can ignore. Please
goto Adding
an
Extra Swapspace if you want to have
an extra swapspace
added.
Kernel
Parameters:
Please goto Setting Up kernel
Parameter to set the
kernel parameters.
Configuring
Public
and Private network for the Cluster Nodes:
Each node in the
cluster must have 2 network adapter (eth0, eth1) one for the public and
another for the private
network interface (internode communication, interconnect). You make
sure that if you configure eth1 as the private
interface for node1 then, eth1 must be configured as private interface
for the node2.
Follow the below steps to configre these networks:
(1) Change the hostname value by
executing the below command:
For Node node1-pub:
[root@localhost root]# hostname node1-pub
For Node node2-pub:
[root@localhost
root]# hostname node1-pub
(2) Edit the /etc/hosts file as shown below:
[root@localhost root]# cat /etc/hosts
# Do not remove the following line, or various programs
# that require network functionality will fail.
127.0.0.1
localhost.localdomain localhost
# Hostname for the Public Nodes in the RAC (eth0)
216.160.37.154 node1-pub.oracledba.org node1-pub
216.160.37.156 node2-pub.oracledba.org node2-pub
# Hostname for the Private Nodes in the RAC (eth1)
192.168.203.1 node1-prv.oracledba.org
node1-prv
192.168.203.2 node2-prv.oracledba.org
node2-prv
If you do
not have static IP for the public network interface, you can go for
192.168.*.* instead.
For e.g,
# Hostname for the Public Nodes in the RAC (eth0)
192.168.10.1
node1-pub.oracledba.org node1-pub
192.168.10.2
node2-pub.oracledba.org node2-pub
(3) Edit OR create the
/etc/sysconfig/network-scripts/ifcfg-eth0 as shown below:
If you have static IPs:
create the same file on both the nodes as shown below.
[root@localhost
root]# cat /etc/sysconfig/network-scripts/ifcfg-eth0
DEVICE=eth0
BOOTPROTO=dhcp
ONBOOT=yes
TYPE=Ethernet
If you DO NOT have static IPs:
Add the entries like below into
/etc/sysconfig/network-scripts/ifcfg-eth0
DEVICE=eth0
BOOTPROTO=none
ONBOOT=yes
TYPE=Ethernet
USERCTL=no
IPADDR=192.168.10.1 -- For node1-pub Node
IPADDR=192.168.10.2 -- For
node2-pub Node
(4) Edit OR create the
/etc/sysconfig/network-scripts/ifcfg-eth1 as shown below:
For Node node1-pub:
[root@localhost
root]# cat /etc/sysconfig/network-scripts/ifcfg-eth1
DEVICE=eth1
BOOTPROTO=none
ONBOOT=yes
TYPE=Ethernet
USERCTL=no
PEERDNS=no
IPADDR=192.168.203.1
For Node node2-pub:
[root@localhost
root]# cat /etc/sysconfig/network-scripts/ifcfg-eth1
DEVICE=eth1
BOOTPROTO=none
ONBOOT=yes
TYPE=Ethernet
USERCTL=no
PEERDNS=no
IPADDR=192.168.203.2
(5) Edit the /etc/sysconfig/network
file with the below contents:
For Node node1-pub:
[root@localhost
root]# cat /etc/sysconfig/network
NETWORKING=yes
HOSTNAME=node1-pub
For Node node2-pub:
[root@localhost
root]# cat /etc/sysconfig/network
NETWORKING=yes
HOSTNAME=node2-pub
(6) Restart
the network service OR reboot the nodes:
After I rebooted both the nodes, I
varified the network interface configurations by running the ifconfig
command as shown below.
[root@node2-pub root]# ifconfig
eth0 Link encap:Ethernet
HWaddr
00:13:46:6A:FC:6D
inet addr:216.160.37.156
Bcast:216.160.37.159 Mask:255.255.255.248
UP
BROADCAST
RUNNING MULTICAST MTU:1500 Metric:1
RX
packets:127
errors:0 dropped:0 overruns:0 frame:0
TX
packets:126
errors:0 dropped:0 overruns:0 carrier:0
collisions:0
txqueuelen:1000
RX
bytes:18240
(17.8 Kb) TX bytes:15412 (15.0 Kb)
Interrupt:10
Base address:0xec00
eth1 Link encap:Ethernet
HWaddr
00:06:5B:AE:AE:7F
inet addr:192.168.203.2
Bcast:192.168.203.255 Mask:255.255.255.0
UP
BROADCAST
RUNNING MULTICAST MTU:1500 Metric:1
RX
packets:172
errors:0 dropped:0 overruns:0 frame:0
TX
packets:181
errors:0 dropped:0 overruns:0 carrier:0
collisions:0
txqueuelen:1000
RX
bytes:21404
(20.9 Kb) TX bytes:20068 (19.5 Kb)
Interrupt:11
Base address:0xe880
lo Link encap:Local
Loopback
inet
addr:127.0.0.1 Mask:255.0.0.0
UP
LOOPBACK
RUNNING MTU:16436 Metric:1
RX
packets:4496
errors:0 dropped:0 overruns:0 frame:0
TX
packets:4496
errors:0 dropped:0 overruns:0 carrier:0
collisions:0
txqueuelen:0
RX
bytes:482566
(471.2 Kb) TX bytes:482566 (471.2 Kb)
Creating
oracle OS User
Account:
You
need OS “oracle” user account created which owns the Oracle
software. Oracle Software installation
needs
to be proceeds by this account. Oracle software installation (without
Companion CD) requires 6 GB
of
free space available for the ORACLE_BASE directory. Please make sure
that the mount point where you
plan to install Software has
required free space
available. You can use “df –k” to check this out.
[root@node2-pub root]# df -k
Filesystem
1K-blocks Used Available Use% Mounted on
/dev/hda2
18113556 3923072 13270364 23% /
/dev/hda1
101089 14036
81834 15% /boot
none
126080
0 126080 0% /dev/shm
-
I
had about 13GB of free space available on “/” mount point. So I
decided to install Oracle under this
mount
point. RAC requires to have oracel user account created on all the
nodes with the same
user id and group id. So, create oracle user account with this property
by executing the below series of
command on all the RAC nodes.
- groupadd -g 900 dba
- groupadd -g 901 oinstall
useradd -u 900 -g oinstall -G dba oracle
passwd oracle
Plesae verify that oracle user has
same gid and uid on all the RAC nodes by executing the this command
[oracle@node2-pub oracle]$ id
uid=900(oracle) gid=901(oinstall) groups=901(oinstall),900(dba)
[oracle@node1-pub oracle]$ id
uid=900(oracle) gid=901(oinstall) groups=901(oinstall),900(dba)
Creating
Oracle
Software Directories:
As
per OFA, oracle base directory has the path:
/mount_point/app/oracle_sw_owner where,
mount_point
is
the mount point directory for the file system that will contain the
Oracle software. I have used
/u01
for the mount point directory. However, you could choose
another mount point directory,
such as /oracle
or /opt/oracle.
oracle_sw_owner
is the operating system user name of the Oracle software owner, for
example oracle.
Perform the below steps on all the
nodes in cluster.
[root@node1-pub
root]#
mkdir -p
/u01/app/oracle -- ORACLE_BASE
[root@node1-pub
root]#
mkdir -p
/u01/app/oracle/product/9.2.0 -- ORACLE_HOME
[root@node1-pub
root]# mkdir -p
/u01/app/oracle/product/9.2.0
[root@node1-pub
root]# mkdir -p /u01/app/oracle/product/9.2.0/oracm/log
[root@node1-pub
root]# mkdir -p /u01/app/oracle/product/9.2.0/network/log
[root@node1-pub
root]# mkdir -p /u01/app/oracle/product/9.2.0/network/trace
[root@node1-pub
root]# mkdir -p /u01/app/oracle/product/9.2.0/rdbms/log
[root@node1-pub
root]# mkdir -p /u01/app/oracle/product/9.2.0/rdbms/audit
[root@node1-pub
root]# mkdir -p /u01/app/oracle/product/9.2.0/network/agent/log
[root@node1-pub
root]# mkdir -p /u01/app/oracle/product/9.2.0/network/agent/reco
[root@node1-pub
root]#
mkdir -p
/u02/oradata/ocfs -- For
database to be stored on ocfs
[root@node1-pub
root]#
mkdir -p
/u02/oradata/raw -- For
database to be stored on raw
devices (volumes)
[root@node1-pub
root]#
chown -R oracle:oinstall /u01
[root@node1-pub
root]#
chown -R oracle:oinstall /u02
[root@node1-pub
root]#
chmod -R 775 /u01/app/oracle
[root@node1-pub
root]#
chmod -R 775 /u02
Setup rsh, rcp,
rlogin
oracle
user Equivalence on Both the Cluster Nodes:
For 9i RAC, it is required to have
oracle users on all nodes to be set up in such a way that they are not
asked for the password
to perform remote operations on the local as well as remote nodes in
cluster. 9i RAC uses rsh, rcp utility to perform remote
operations unlike 10g RAC where it is being performed by SSH. Set up
oracle user equivalence by adding entries for all the
nodes in the cluster on the node from which you will run OUI, including
the local node, to either .rhosts file of the oracle account ot the
/etc/hosts.equiv file. Perform the following steps as root on all the
nodes:
(1)  Create the /etc/rhosts.equiv file and add all the node name in the clusters (public as well as private) along with oracle as os user.
         This will allow only oracle to perform repote operations on the nodes withoug being asked for the password.

	[root@node1-pub root]# cat > /etc/hosts.equiv
	+node1-pub oracle
	+node1-prv oracle
	+node2-pub oracle
	+node2-prv oracle

	[root@node1-pub root]# cat  /etc/hosts.equiv
	+node1-pub oracle
	+node1-prv oracle
	+node2-pub oracle
	+node2-prv oracle
	[root@node1-pub root]# chmod 600 /etc/hosts.equiv
	[root@node1-pub root]# ls -l /etc/hosts.equiv
	-rw-------    1 root     root           72 Dec 14 22:21 /etc/hosts.equiv
	[root@node1-pub root]#
(2)
Now make sure that you have rsh-server and rsh installed on all the
nodes.
[root@node1-pub root]# rpm -qa rsh*
rsh-0.17-17.6
rsh-server-0.17-17.6
(3)
Connect as root and open the /etc/xinetd.d/r* files and change the
entry "Disable=yes" to "Disable=no" and restart the xinetd service.
Also make the rsh and rlogin
service enable to restart on every boot with the help of chkconfig
command.
[root@node1-pub xinetd.d]# service xinetd restart
Stopping xinetd:                                           [  OK  ]
Starting xinetd:                                           [  OK  ]
[root@node1-pub xinetd.d]# chkconfig rsh on
[root@node1-pub xinetd.d]# chkconfig rlogin on
 rsh node1-prv date
(4) Test
the oracle user equivalcy by executing the following set of commands as
oracle user from each node in the cluster.
Make sure that oracle
is not asked for the password.
rsh node1-prv date
rsh node2-prv date
rsh node1-pub date
rsh node2-pub date

rlogin node1-prv
rlogin node2-prv
rlogin node1-pub
rlogin node2-pub
Setup OS Environment
-- linking gcc:
Create
the following symbolic links to put gcc296 and g++296 in the $PATH
variable. These are required during the relink process of Oracle
Software binaries.
	mv /usr/bin/gcc /usr/bin/gcc323
	mv /usr/bin/g++ /usr/bin/g++323
	ln -s /usr/bin/gcc296 /usr/bin/gcc
	ln -s /usr/bin/g++296 /usr/bin/g++
Executing
hostname should return the fully qualified name (hostname.domainname).
[root@node1-pub
root]# hostname
node1-pub.oracledba.org
Unset the java environment Variable if any.
unset JAVA_HOME
Setup
oracle User Environment:
Add the below parameters into the .bash_profile file of oracle user.
Usually this file is located under /home/oracle.
	export ORACLE_BASE=/u01/app/oracle
	export ORACLE_HOME=$ORACLE_BASE/product/9.2.0
	export ORACLE_SID=RacDB1      # on node2, it is RacDB2
	export LD_LIBRARY_PATH=$ORACLE_HOME/lib:/lib:/usr/lib:/usr/local/lib
        export LD_ASSUME_KERNEL=2.4.19
	export TNS_ADMIN=$ORACLE_HOME/network/admin
	export ORA_NLS33=$ORACLE_HOME/ocommon/nls/admin/data
	export ORACLE_TERM=xterm
	export PATH=$PATH:$ORACLE_HOME/bin:/opt/bin:/bin:/usr/bin:/usr/local/bin:/usr/sbin:/usr/X11R6/bin:/usr/local/java/bin:.
	export CLASSPATH=$ORACLE_HOME/jdbc/lib/classes12.zip:$ORACLE_HOME/JRE:$ORACLE_HOME/jlib:$ORACLE_HOME/rdbms/jlib:$ORACLE_HOME/network/jlib:.
Obtaining Extra 9i
patchsets:
Along
with the base software (9.2.0.1) you also need to download and apply
patchsets on top of the base release to fix most of the bugs
that comes with base release (9.2.0.1). Please download the below
patches from the http://metalink.oracle.com. If you are installing for
experimental / learning purpose then you do not need to apply all the
patches.
p3006854_9204_LINUX.zip:
This patch is used to fix the below error
generated by executing runInstaller.
Error occurred during initialization of
VM
Unable to load native library:
/tmp/OraInstall2005-12-16_02-19-25AM/jre/lib/i386/libjava.so: symbol
__libc_wait, version GLIBC_2.0 not defined in file libc.so.6 with link
time reference
This
patch builds /etc/libwait.so and ld.so.preload files. The second file
is used to load the module
libcwait.so on every boot of OS.
p2617419_10102_GENERIC.zip:
This patch supply the opatch utility which is used to apply oracle
patch.
p3095277_9204_LINUX.zip:
This patch is required to upgrade the 9.2.0.1 database server to
9.2.0.4 server.
p3119415_9204_LINUX.zip:
This patch fixes the linking error during the installation of
intelligent agent file: ins_oemagent.mk
Configuring
System for Shared Disk
Storage
Device (Firewire):
Every
node in the cluster must have access to the shared disk. So the
shared disk must support the concurrent access to all
nodes in cluster
in order to successfully build 10g RAC. I chose firewire Disk as a
shared
storage media because it is a cost
effective solution ifyou just want
to have hands-on practice on 10g RAC without investing more money.
After you install the
Redhat LINUX AS 3 system into both the node, please goto the
http://oss.oracle.com/projects/firewire/files and download the
appropriate firewire kernel to support firewire HD. I downloaded and
installed the below rpms.
[root@localhost
root]# uname -r
2.4.21-37.EL
kernel-2.4.21-27.0.2.ELorafw1.i686.rpm
[root@localhost
root]# rpm -ivh --force kernel-2.4.21-27.0.2.ELorafw1.i686.rpm
This
will also update the /etc/grub.conf file with the added entry of this
new firewire kernel. in the below file, default is set to 1
which means that the system will use the original kernel by
default. If you want to make the newly added firewire kernel
as default, you can simply change the default=1 to default=0. It is required to set this kernel to
default in the situation if this
node is restarted by hangcheck-timer or for anyreason, then
it should be rebooted with the right kernel.
[root@node2-pub
root]# cat /etc/grub.conf
# grub.conf generated by anaconda
#
# Note that you do not have to rerun grub after making changes to
this
file
# NOTICE: You have a /boot partition. This means that
# all
kernel and
initrd paths are relative to /boot/, eg.
# root (hd0,0)
# kernel
/vmlinuz-version ro root=/dev/hda2
# initrd
/initrd-version.img
#boot=/dev/hda
default=0
timeout=10
splashimage=(hd0,0)/grub/splash.xpm.gz
title CentOS (2.4.21-27.0.2.ELorafw1)
root (hd0,0)
kernel
/vmlinuz-2.4.21-27.0.2.ELorafw1 ro root=LABEL=/
initrd
/initrd-2.4.21-27.0.2.ELorafw1.img
title CentOS-3 (2.4.21-37.EL)
root (hd0,0)
kernel /vmlinuz-2.4.21-37.EL
ro root=LABEL=/
initrd
/initrd-2.4.21-37.EL.img
Also
update the /etc/modules.conf file and add the below lines at the end of
file on BOTH THE NODES. This will load the firewire
kernel modules and drivers at reboot.
alias ieee1394-controller ohci1394
options sbp2 sbp2_exclusive_login=0
post-install sbp2 insmod sd_mod
post-install sbp2 insmod ohci1394
post-remove sbp2 rmmod sd_mod
Now, Shutdown both the nodes and then connect the firewire shared disk
to them. power on the firewire disk and
then restart both the nodes using the new firewire kernel 2.4.21-27.0.2.ELorafw1 one by
one. Confirm that the
firewire disk is visible from both the nodes by running the below
command as root on both the node.
[root@localhost
root]# dmesg | grep ieee1394
ieee1394: Host added: Node[00:1023] GUID[0000d1008016f8e8]
[Linux OHCI-1394]
ieee1394: Device added: Node[01:1023]
GUID[00d04b3b1905e049] [LaCie Group SA ]
ieee1394: sbp2: Query logins to SBP-2 device successful
ieee1394: sbp2: Maximum concurrent
logins supported: 4
ieee1394: sbp2: Number of active logins: 0
ieee1394: sbp2: Logged into SBP-2 device
ieee1394: sbp2: Node[01:1023]: Max speed [S400] - Max payload [2048]
ieee1394: Device added: Node[00:1023]
GUID[00309500a0042ef9] [Linux OHCI-1394]
ieee1394: Node 00:1023 changed to 01:1023
ieee1394: Node 01:1023 changed to 02:1023
ieee1394: sbp2: Reconnected to SBP-2 device
ieee1394: sbp2: Node[02:1023]: Max speed [S400] - Max payload [2048]
[root@localhost root]# dmesg | grep sda
Attached scsi disk sda at scsi0, channel 0, id 0, lun 0
SCSI device sda: 240121728 512-byte hdwr sectors (122942 MB)
sda:
Partitioning
the
Shared disk:
In 9i RAC, we have 2
options for storing the database files,
one is OCFS and the other is traditional raw device. This
document covers all the options
of storing database
files on the shared disk. I
partitioned the disks as shown below to
create 4 different partitions
out of which /dev/sda2 and /dev/sda3 will be used create database with
both the storage
options. The Quorum File and the shared Server Config file
MUST reside on the raw partition such that it must be accesed
by all the nodes in the cluster. We have 2 options to store these file,
one is raw device and second is OCFS. Since I am going to
use /dev/sda2 as OCFS, I am going to use the same partitions for this
purpose too. I could instead create the two small raw
partitions for e.g, /dev/sda1 (5MB) and /dev/sda2 (100MB) for this
purpose. Since OCFS make this task easy, I prefer to use
OCFS over the raw partitions.
OCFS supports the following types of files


            (1)
All types of database files (dbf, control and redologs)

            (2)
Quorum file -- Goto
Here to read more on Quorum file

            (3)
Shared server config file.
to
create clustered database on OCFS file system as well as QuorumFile and
Server config File.
/dev/sda3 to
create clustered database using raw devices / volumes
[root@node1-pub root]# fdisk /dev/sda
The number of cylinders for this disk is set to 24792.
There is nothing wrong with that, but this is larger than 1024,
and could in certain setups cause problems with:
1) software that runs at boot time (e.g., old versions of LILO)
2) booting and partitioning software from other OSs
(e.g., DOS FDISK, OS/2 FDISK)
Command (m for help): p
Disk /dev/sda: 203.9 GB, 203928109056 bytes
255 heads, 63 sectors/track, 24792 cylinders
Units = cylinders of 16065 * 512 = 8225280 bytes
Device Boot
Start End
Blocks Id System
Command (m for help): n
Command action
e extended
p primary partition (1-4)
p
Partition number (1-4): 1
First cylinder (1-24792, default 1):
Using default value 1
Last cylinder or +size or +sizeM or +sizeK (1-24792, default 24792):
+500M
Command (m for help): n
Command action
e extended
p primary partition (1-4)
p
Partition number (1-4): 2
First cylinder (63-24792, default 63):
Using default value 63
Last cylinder or +size or +sizeM or +sizeK (63-24792, default 24792):
+50000M
Command (m for help): n
Command action
e extended
p primary partition (1-4)
p
Partition number (1-4): 3
First cylinder (6143-24792, default 6143): +50000M
Value out of range.
First cylinder (6143-24792, default 6143):
Using default value 6143
Last cylinder or +size or +sizeM or +sizeK (6143-24792, default 24792):
+50000M
Command (m for help): n
Command action
e extended
p primary partition (1-4)
p
Selected partition 4
First cylinder (12223-24792, default 12223):
Using default value 12223
Last cylinder or +size or +sizeM or +sizeK (12223-24792, default 24792):
Using default value 24792
Command (m for help): p
Disk /dev/sda: 203.9 GB, 203928109056 bytes
255 heads, 63 sectors/track, 24792 cylinders
Units = cylinders of 16065 * 512 = 8225280 bytes
Device Boot
Start End
Blocks Id System
/dev/sda1
1 62
497983+ 83 Linux
/dev/sda2
63 6142 48837600
83 Linux
/dev/sda3
6143 12222 48837600 83
Linux
/dev/sda4
12223 24792 100968525 83 Linux
Command (m for help): w
The partition table has been altered!
Calling ioctl() to re-read partition table.
Syncing disks.
[root@node1-pub root]#
[root@node1-pub root]#
partprobe -- [ Perform this step on all the nodes in cluster]
[root@node1-pub root]#
Installing
and Configuring OCFS
(Oracle Cluster File System):
We have 2 storage options to
store the clusterd database file on the shared disk.
(1)
Traditional raw device option.
(2) ocfs
(Oracle Cluster File System).
I am going to use
/dev/sda2 for ocfs.
Download and Install the required
rpms:
Please download the below rpms from Oracle's
website and install them as shown.
ocfs-2.4.21-EL-1.0.14-1.i686.rpm (For
UniProcessor)
ocfs-2.4.21-EL-smp-1.0.14-1.i686.rpm
(For SMPs)
ocfs-tools-1.0.10-1.i386.rpm
ocfs-support-1.1.5-1.i386.rpm
[root@node1-pub root]# rpm -Uvh /rpms/ocfs-2.4.21-EL-1.0.14-1.i686.rpm \
>
/rpms/ocfs-tools-1.0.10-1.i386.rpm \
>
/rpms/ocfs-support-1.1.5-1.i386.rpm
Preparing...
########################################### [100%]
1:ocfs-support
########################################### [ 33%]
2:ocfs-2.4.21-EL
########################################### [ 67%]
Linking OCFS module into the module path [ OK ]
3:ocfs-tools
########################################### [100%]
[root@node1-pub root]#
[root@node1-pub root]# cat /etc/ocfs.conf
#
# ocfs config
# Ensure this file exists in /etc
#
node_name = node1-prv
ip_address = 192.168.203.1
ip_port = 7000
comm_voting = 1
guid =
83C074F61764EA84570200065BBED79C
[root@node1-pub root]#
Loading
OCFS Module:
[root@node1-pub root]# load_ocfs
/sbin/modprobe ocfs
node_name=node2-pub ip_address=192.168.203.2 cs=1843
guid=238426EC6845F952C83A00065BAEAE7F ip_port=7000 comm_voting=1
modprobe: Can't locate module ocfs
load_ocfs: insmod failed
If you get the above error follow
the below steps to fix this:
Verify that you have ocfs.o module under
/lib/modules/2.4.21-27.0.2.ELorafw1/kernel/drivers/addon/ocfs/
directory.
[root@node1-pub
root]# ls -l
/lib/modules/2.4.21-27.0.2.ELorafw1/kernel/drivers/addon/ocfs/ocfs.o
lrwxrwxrwx 1 root
root 38 Dec
19 23:14
/lib/modules/2.4.21-27.0.2.ELorafw1/kernel/drivers/addon/ocfs/ocfs.o
-> /lib/modules/2.4.21-EL-ABI/ocfs/ocfs.o
IF THIS FILE EXISTS THEN:
open the /sbin/load_ocfs file using vi or anyother
editor and change the below line as shown.
(Line Number 93)
#
If you must hardcode an absolute module path for testing, do it HERE.
# MODULE=/path/to/test/module/ocfsX.o
Change to:
#
If you must hardcode an absolute module path for testing, do it HERE.
MODULE=/lib/modules/2.4.21-27.0.2.ELorafw1/kernel/drivers/addon/ocfs/ocfs.o
IF THIS FILE DOES NOT EXISTS THEN:
Create an sybolic link as shown below.
mkdir
/lib/modules/2.4.21-27.0.2.ELorafw1/kernel/drivers/addon/ocfs/
ln -s /lib/modules/2.4.21-EL-ABI/ocfs/ocfs.o /lib/modules/2.4.21-27.0.2.ELorafw1/kernel/drivers/addon/ocfs/ocfs.o
Now try
again to load the same module
[root@node1-pub root]# load_ocfs
If you get the error again then moidify the /sbin/load_ocfs file as
shown in the above step after creating the
symbolic link
[root@node1-pub root]# load_ocfs
/sbin/insmod
/lib/modules/2.4.21-27.0.2.ELorafw1/kernel/drivers/addon/ocfs/ocfs.o
node_name=node2-prv ip_address=192.168.203.2 cs=1843
guid=238426EC6845F952C83A00065BAEAE7F ip_port=7000 comm_voting=1
Warning: kernel-module version mismatch
/lib/modules/2.4.21-27.0.2.ELorafw1/kernel/drivers/addon/ocfs/ocfs.o
was compiled for kernel version 2.4.21-27.EL
while this kernel is version
2.4.21-27.0.2.ELorafw1
Warning: loading
/lib/modules/2.4.21-27.0.2.ELorafw1/kernel/drivers/addon/ocfs/ocfs.o
will taint the kernel: forced load
See http://www.tux.org/lkml/#export-tainted for information
about tainted modules
Module ocfs loaded, with warnings
You may get
the above warning but this may be OK.
Verify that the ocfs module is loaded by executing the below command.
[root@node1-pub root]# lsmod | grep ocfs
ocfs
299104 0 (unused)
Creating
and Mounting OCFS (Oracle Cluster File System):
Create
the filesystem using mkfs:
Execute the
below series of command from any one node to format the /dev/sda1
partition with the ocfs.
[root@node1-pub
root]# mkfs.ocfs -F -b 128 -L /u02/oradata/ocr -m /u02/oradata/ocr -u
900 -g 901 -p 0755 /dev/sda1
Cleared volume header sectors
Cleared node config sectors
Cleared publish sectors
Cleared vote sectors
Cleared bitmap sectors
Cleared data block
Wrote root directory and system files
Updated global bitmap
Wrote volume header
Where -b= blocksize
m= mountpoint
u= UID of oracle user
g=GID of oinstall group
p=permission
Mounting
OCFS (Oracle Cluster File System): (Do
this on both the node)
[root@node1-pub root]# mount
-t ocfs /dev/sda2 /u02/oradata/ocfs
Add the below line into the /etc/fstab file to mount the
ocfs automatically on every reboot of system.
/dev/sda2 /u02/oradata/ocfs
ocfs _netdev 0 0
[root@node2-pub root]# service ocfs start
Loading
OCFS:
[ OK ]
[root@node2-pub root]# chkconfig ocfs on
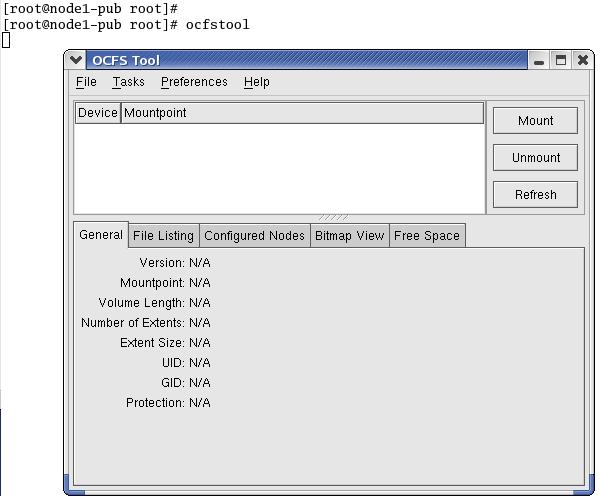
Create the
filesystem using "ocfstool" command line utility:
Please follow
the GUI screenshots of creating and mounting ocfs filesystem.
run the ocfstool
from command
as shown below:
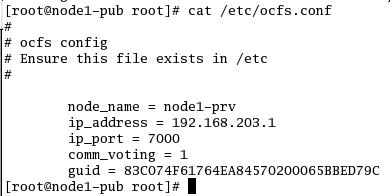
(1) Perform this step on Both the Nodes.
 Cleck on the "Tasks" Button --> Select "Generate Configs".
---> Select interface = eth1
port =
7000 and
Node
Name = node1-prv (For node2, it would be node2-prv)
Cleck on the "Tasks" Button --> Select "Generate Configs".
---> Select interface = eth1
port =
7000 and
Node
Name = node1-prv (For node2, it would be node2-prv)
 Confirm changes by looking into the /etc/ocfs.conf file. The contents
of this file
should be like this:
Confirm changes by looking into the /etc/ocfs.conf file. The contents
of this file
should be like this:
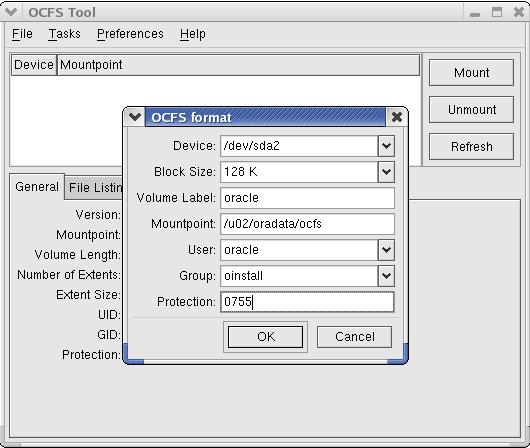
 (2)
Now, Click on the "Tasks" button and select 'Format". You will see the
screen like below.
Select the appropriate value and click OK button.
You need to perform this step only
from one node.
(2)
Now, Click on the "Tasks" button and select 'Format". You will see the
screen like below.
Select the appropriate value and click OK button.
You need to perform this step only
from one node.

(3)
Now the /dev/sda2 is formated with the ocfs. Now this is the time to
mount this filesystem.
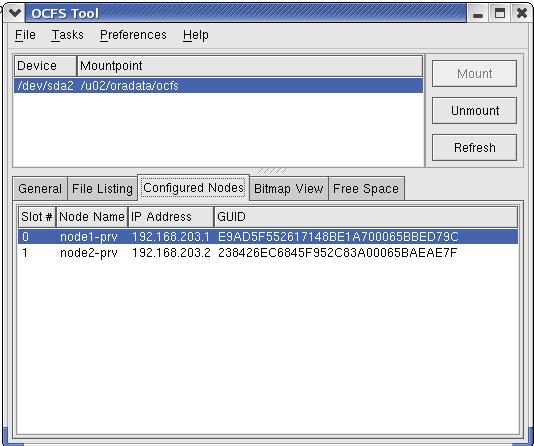
Please perform this step on both the nodes. Click on the "Mount"
button. You should see the
/dev/sda2 is mounted under /u02/oradata/ocfs mountpoint. Also confirm
that you see both the
nodes in the "Configured Nodes" section.
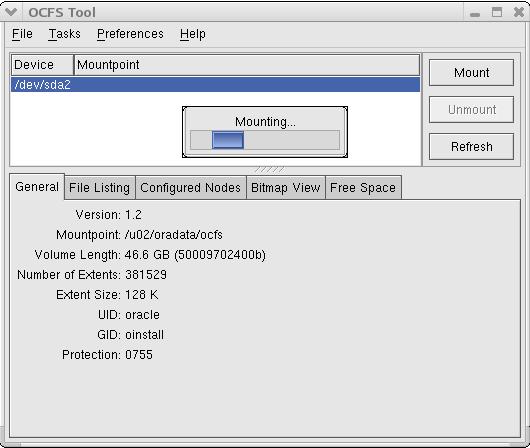
After mounting the filesystem on both the nodes, you should see both
the nodes
under the "Configured Nodes" tab.
Add the below line into the /etc/fstab file
on both the nodes to mount the
ocfs automatically on every reboot.
/dev/sda2 /u02/oradata/ocfs
ocfs _netdev 0 0
perform this step on both
the nodes.
Checking
the Configuration of the
hangcheck-timer Module:
Before
Installing Oracle Real Application Cluster, We need to verify
that the hangcheck-timer module is loaded and configured
correctly. The hangcheck-timer module monitors the
Linux kernel for extended operating system hangs that could affect
the reliability of a RAC nodeand
cause a database corruption. If a hang occures than the module restarts
the node in seconds. There are
hangcheck_tick
and hangcheck_margin
parameters that governs the behaviou of the modules:
The hangcheck_tick
parameter defines how often, in seconds, the hangcheck-timer check the
node for hang. The
default value is 60 seconds.
The
hangcheck_margin
parameter defines how long the hangcheck-timer waits, in seconds, for a
response from Kernel. The
Default value
is 180 seconds.
If the Kernel
fails to respond within the total of (hangcheck_tick + hangcheck_margin) seconds,
the hangcheck-timer module restarts the
system.
Verify that
the hangcheck-timer
module is running:
(1)
Enter the below connad on each node.
[root@node1-pub
root]# lsmod | grep hangcheck-timer
hangcheck-timer
2648 0 (unused)
(2)
If the module is not listed by the above command, then enter the below
command to load the module on all the nodes.
[root@node1-pub
root]# insmod
hangcheck-timer hangcheck_tick=30 hangcheck_margin=180
(3) Also
add the below line at the end of /etc/rc.local file to ensure that this
module is loaded at every reboot.
insmod
hangcheck-timer hangcheck_tick=30 hangcheck_margin=180
Alternatively, you could also add the
same into the /etc/modules.conf file as shown below.
options
hangcheck-timer hangcheck_tick=30 hangcheck_margin=180
REFERENCES:
Oracle
Documents