 |
Step By Step
Instructions on Installing Oracle 9iR2 Clusterware Software
(9.2.0.1) 32-bit on
RedHat AS 3 x86 (RHEL3) / CentOS
3 x86
By Bhavin Hingu
|
This
document explains the step by step process of installing Oracle 9iR2
(9.2.0.1) Clusterware Software using OUI.
Installing
Oracle 9iR2
(9.2.0.1) Clusterware Software:
Task
List:
Shut
down any running Oracle processes:
If you are installing Oracle Clusterware
on a node that already has
a single-instance Oracle Database 9i installation, then stop the
existing instances. After Oracle Clusterware is installed, start up
the instances again.
You
can upgrade some or all nodes of an existing Cluster Ready Services
installation. For example, if you have a six-node cluster, then
you can
upgrade two nodes each in three upgrading sessions.Base the number of
nodes that you upgrade in each session on the load the
remaining nodes
can handle. This is called a "rolling upgrade."
Creating
QuorumFile:
I have used OCFS partition /dev/sda2 (mounted on /u02/oradata/ocfs) to
store database files as well as Quorum File. So I have created Quorum
File under this mount point. As this is shared by all the nodes in the
cluster, it is created ONLY from one node.
[oracle@node1-pub oracle]$ cat > /u02/oradata/ocfs/QuorumFile
[oracle@node1-pub oracle]$ ls /u02/oradata/ocfs/QuorumFile
/u02/oradata/ocfs/QuorumFile
[oracle@node1-pub oracle]$
Running
OUI
(Oracle Universal
Installer) to install Oracle Clusterware:
Complete the following steps to install
Oracle Clusterware on your
cluster.
You
need to run the
runInstaller from ONLY one node (any single node in the cluster).
Start the runInstaller
command as oracle user from
any one node When OUI displays the Welcome page, click Next
Xlib:
connection to ":0.0" refused by server
Xlib: No protocol specified
Can't connect to X11 window server using
':0.0' as the value of the DISPLAY variable.
If you get the above error,
please execute the below command as
root and then start the runInstaller by connecting as oracle.
[root@node1-pub root]# xhost +
access control disabled, clients can connect from any host
[root@node1-pub root]# su - oracle
If you get the below error,
then apply the below patch to fix this.
[oracle@node1-pub oracle]$
/mnt/cdrom/runInstaller
[oracle@node1-pub oracle]$
Initializing Java Virtual Machine from
/tmp/OraInstall2005-12-16_02-19-25AM/jre/bin/java. Please wait...
Error occurred during
initialization of VM
Unable to load native library:
/tmp/OraInstall2005-12-16_02-19-25AM/jre/lib/i386/libjava.so: symbol
__libc_wait, version GLIBC_2.0 not defined in file libc.so.6 with link
time reference
Download
patch p3006854_9204_LINUX.zip from metalink and apply it as shown below.
[root@node1-pub root]# unzip /tmp/p3006854_9204_LINUX.zip
Archive: /tmp/p3006854_9204_LINUX.zip
creating: 3006854/
inflating: 3006854/rhel3_pre_install.sh
inflating: 3006854/README.txt
[root@node1-pub root]# cd 300*
[root@node1-pub 3006854]# sh rhel3_pre_install.sh
Applying patch...
Ensuring permissions are correctly set...
Done.
Patch successfully applied
[root@node1-pub 3006854]# cp
/etc/libcwait.so /lib/libcwait.so
[oracle@node1-pub
oracle]$
/mnt/cdrom/runInstaller

CLICK Next

Select Oracle Cluster Manager and CLICK
Next

Enter public Node names (node1-pub,
node2-pub) and then CLICK Next

Enter Private Node names (node1-prv,
node2-prv) and then CLICK Next

Leave the Default value as it is and
then CLICK Next. Anyhow, we are not going to use
Wathdog. You will see in the next section, I have configured Cluster
Manager to use
hangcheck-timer module instead of watchdog.
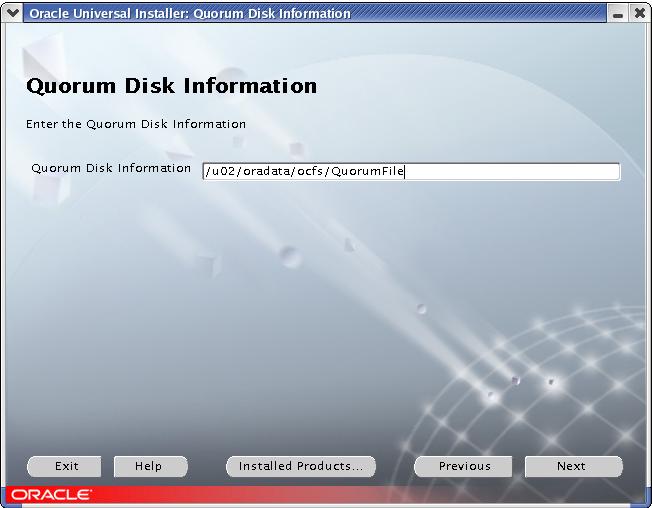 Enter the Quorum
file as we created in the previous section and then Click Next.
Enter the Quorum
file as we created in the previous section and then Click Next.

CLICK Install


CLICK Exit
Verifying Cluster
Manager Configuration:
At this point make sure that the clusterware is configured correctly on
all the nodes by verifying the contents of the
$ORACLE_HOME/oracm/admin/cmcfg.ora file. It should be looked like
below. This file MUST contain all the public and private node names. If
any of the nodes is missing, then you do not have completed the network
configuration correctly as memtioned in pre-Installation task. Also it
MUST assign private hostname of the node to the HostName variable.

Applying 9.2.0.4 Cluster
Manager Patchset:
Unzip the patchfile..
[root@node1-pub root]# ls
p3095277_9204_LINUX.zip
[root@node1-pub root]# unzip p3095277_9204_LINUX.zip
Optionally, you can write it on the CD.
[root@node1-pub root]# mkisofs -r 3095277 | cdrecord -v dev=1,1,0
speed=20 -
Insert the newly burn cd into
the cdrom and Start the runInstaller as oracle like below. If you have
not copied this file on the
disk, then you can start the runInstaller from the directory where you
have unzipped this file.
[oracle@node1-pub
oracle]$ ls /mnt/cdrom
install oraparam.ini rr_moved runInstaller stage
[oracle@node1-pub
oracle]$ /mnt/cdrom/runInstaller
Follow the instructions and enter the appropriate values. You will see
most of the time the same screens as the
ones we saw during installing 9.2.0.1 Clusterware.

CLICK Next

CLICK Install


Click Exit
Modifying Cluster Manager
Files:
Once you upgrade Cluster Manager to 9.2.0.4, you do not
require watchdog daemon any more. Instead you can make use of
hangcheck-timer module that comes with Linux kernel by default. In the
Pre-Installation task, I have configured the hangcheck-timer
module. So We need to let Cluster Manager know that it has to use
hangcheck-timer over watchdog. So update the cmcfg.ora,
ocmargs.ora and ocmstart.sh file and remove/comment out watchdog
related entries ON BOTH THE NODES.
$ORACLE_HOME/oracm/admin/cmcfg.ora:
Edit the MissCount to 300. It must be >=
hangcheck_tick + hangcheck_timer.
Remove the entries of
WatchdogSafetyMargin and WatchdogTimerMargin
Add
KernelModuleName=hangcheck-timer
The Modified file look like this:
[oracle@node1-pub oracle]$ cat $ORACLE_HOME/oracm/admin/cmcfg.ora
HeartBeat=15000
ClusterName=Oracle Cluster Manager, version 9i
PollInterval=1000
MissCount=300
KernelModuleName=hangcheck-timer
PrivateNodeNames=node1-prv node2-prv
PublicNodeNames=node1-pub node2-pub
ServicePort=9998
CmDiskFile=/u02/oradata/ocfs/QuorumFile
HostName=node1-prv
$ORACLE_HOME/oracm/admin/ocmargs.ora:
Comment Out the watchdog entry from this file.
[oracle@node1-pub oracle]$ cat $ORACLE_HOME/oracm/admin/ocmargs.ora
# Sample configuration file $ORACLE_HOME/oracm/admin/ocmargs.ora
#watchdogd
oracm
norestart 1800
$ORACLE_HOME/oracm/bin/ocmstart.sh:
Comment out the lines in blue from this file.
......
......
# watchdogd's default log file
#WATCHDOGD_LOG_FILE=$ORACLE_HOME/oracm/log/wdd.log
# watchdogd's default backup file
#WATCHDOGD_BAK_FILE=$ORACLE_HOME/oracm/log/wdd.log.bak
# Get arguments
#watchdogd_args=`grep '^watchdogd'
$OCMARGS_FILE |\
# sed -e 's+^watchdogd *++'`
......
......
# Check watchdogd's existance
#if watchdogd status | grep
'Watchdog daemon active' >/dev/null
#then
# echo 'ocmstart.sh: Error:
watchdogd is already running'
# exit 1
#fi
# Update the timestamp to prevent too frequent startup
touch $TIMESTAMP_FILE
# Backup the old watchdogd log
#if test -r $WATCHDOGD_LOG_FILE
#then
# mv $WATCHDOGD_LOG_FILE
$WATCHDOGD_BAK_FILE
#fi
# Startup watchdogd
#echo watchdogd $watchdogd_args
#watchdogd $watchdogd_args
....
....
Starting Cluster
Manager on all the Nodes:
You need to start the Cluster Manager as root. So conect as
root and execute the below command from ALL THE NODES.
[root@node1-pub
root]# source /home/oracle/.bash_profile
[root@node1-pub root]# sh $ORACLE_HOME/oracm/bin/ocmstart.sh
oracm </dev/null 2>&1
>/u01/app/oracle/product/9.2.0/oracm/log/cm.out &
[root@node1-pub root]# ps -ef | grep oracm
root 9894 1
0 02:08 pts/0 00:00:00 oracm
root 9895 9894 0 02:08
pts/0 00:00:00 oracm
root 9897 9895 0 02:08
pts/0 00:00:00 oracm
root 9898 9895 0 02:08
pts/0 00:00:00 oracm
root 9899 9895 0 02:08
pts/0 00:00:00 oracm
root 9900 9895 0 02:08
pts/0 00:00:00 oracm
root 9901 9895 0 02:08
pts/0 00:00:00 oracm
root 9902 9895 0 02:08
pts/0 00:00:00 oracm
root 9903 9895 0 02:08
pts/0 00:00:00 oracm
root 9931 9895 0 02:08
pts/0 00:00:00 oracm
root 11936 2567 0 02:23
pts/0 00:00:00 grep oracm
I have seen that after some
time the Cluster Manager dies itself on all the nodes. To over come
this issue, You need
to zero out some of the blocks of QuorumFile as shown below. I got this
solution from Puschitz.com. Thank you Puschitz.
[root@node1-pub root]# su - oracle
[oracle@node1-pub oracle]$ dd if=/dev/zero
of=/u02/oradata/ocfs/QuorumFile bs=4096 count=200
200+0 records in
200+0 records out
[oracle@node1-pub
oracle]$ exit
[root@node1-pub
root]# $ORACLE_HOME/oracm/bin/ocmstart.sh
ocmstart.sh: Error: Restart is too
frequent
ocmstart.sh: Info: Check the
system configuration and fix the problem.
ocmstart.sh: Info: After you
fixed the problem, remove the timestamp file
ocmstart.sh: Info:
"/u01/app/oracle/product/9.2.0/oracm/log/ocmstart.ts"
If you get the above error,
then remove the timestamp file and then start the CM.
[root@node2-pub
root]# rm /u01/app/oracle/product/9.2.0/oracm/log/ocmstart.ts
rm: remove regular empty file
`/u01/app/oracle/product/9.2.0/oracm/log/ocmstart.ts'? y
[root@node2-pub root]# $ORACLE_HOME/oracm/bin/ocmstart.sh
oracm </dev/null 2>&1
>/u01/app/oracle/product/9.2.0/oracm/log/cm.out &
[root@node2-pub root]#
REFERENCES:
Oracle
Documents