Step
By Step Instructions on Installing Oracle Database 10g 32-bit R2
(10.2.0.1) on
RedHat 3 x86 / CentOS 3 x86
NOTE: Installing Oracle 10g on RedHat EL3
works same way as that of on Cent OS 3.
Installing
CentOS:
If
you do not have CentOS installed on your pc, goto www.centos.org
and download the appropriate isos. You can use below
command to copy
iso file on the CD from Linux command line I use scanbus option of
cdrecord utility to locate the device id
which is used to write data
on.
-
|
[root@shree root]# cdrecord -scanbus
Cdrecord-Clone 2.01-dvd (i686-pc-linux-gnu) Copyright (C) 1995-2004
Jörg Schilling
Note: This version is an unofficial (modified) version with DVD support
Note: and therefore may have bugs that are not present in the original.
Note: Please send bug reports or support requests to
http://bugzilla.redhat.com/bugzilla
Note: The author of cdrecord should not be bothered with problems in
this version.
scsidev: 'ATA'
devname: 'ATA'
scsibus: -2 target: -2 lun: -2
Linux sg driver version: 3.5.27
Using libscg version 'schily-0.8'.
cdrecord: Warning: using inofficial libscg transport code version
(schily - Red Hat-scsi-linux-sg.c-1.83-RH '@(#)scsilinux-sg.c 1.83
04/05/20 Copyright 1997 J. Schilling').
scsibus1:
1,0,0 100) 'TOSHIBA ' 'DVD-ROM SD-M1502' '1012' Removable CD-ROM
1,1,0 101)
'SONY ' 'CD-RW CRX140E ' 'A1.0' Removable CD-ROM
1,2,0 102) *
1,3,0 103) *
1,4,0 104) *
1,5,0 105) *
1,6,0 106) *
1,7,0 107) *
[root@shree root]# cdrecord –v –pad speed=4 dev=1,1,0
/path/to/iso/file.iso
|
Please
goto www.centos.org
to get detailed information on installing CentOS.
Packages:
Before
you start installing Oracle10g software, please make sure that you
have the below packages installed on your Linux box, else
you will
get error(s) during the installation process.
-
|
[root@shree root]# rpm -q \
> make \
> gcc \
> glibc
\
> compat-db \
> compat-gcc
\
> compat-gcc-c++
\
> compat-libstdc++
\
> compat-libstdc++-devel
\
> openmotif21 \
> setarch \
> libaio \
make-3.79.1
gcc-3.2.3-34
glibc-2.3.2-95.20
compat-db-4.0.14-5
compat-gcc-7.3-2.96.128
compat-gcc-c++-7.3-2.96.128
compat-libstdc++-7.3-2.96.128
compat-libstdc++-devel-7.3-2.96.128
openmotif21-2.1.30-8
setarch-1.3-1
libaio-0.3.103-3
|
Memory
and swap Space:
Oracle
Documents says that you need at least 512MB of memory and 1024MB of
swap space (Double the size of memory if you have
RAM larger than 2
gigs) to run Oracle (9i and above) Database on Linux.
Well, I have managed to successfully run one 9i and 2
10g instances
(one ASM and one regular) simultaneously on a single linux box with
512 MB of memory. You simply need to adjust
the init.ora memory
parameter for that.
-
|
[root@shree root]# cat /proc/meminfo
|
grep Total
MemTotal: 515768 kB
HighTotal: 0 kB
LowTotal: 515768 kB
SwapTotal: 4192956 kB
VmallocTotal: 499704 kB
|
If
you do not have enough Swap Space, you can add extra temporary swap
space.
-
|
[root@shree root]# echo check the
filesystem
check the filesystem
[root@shree root]# df
Filesystem 1K-blocks Used Available Use% Mounted on
/dev/hda5 40662492 5226432 33370508 14% /
none 257884 0 257884 0% /dev/shm
/dev/hdb1 9621848 3341000 5792072 37% /backup
[root@shree root]# echo "Now I know that I have enough space available
on
/ as well as /backup"
Now I know that I have enough space available on / as well as /backup
[root@shree root]# mkdir /swap
[root@shree root]# cd /swap
[root@shree swap]# echo "Now use dd to create one"
Now use dd to create one
[root@shree swap]# dd if=/dev/zero of=extraSwap bs=1024 count=128000
128000+0 records in
128000+0 records out
[root@shree swap]# echo "Change the permission so that only root can rw
it"
Change the permission so that only root can rw it
[root@shree swap]# chmod 600 extraSwap
[root@shree swap]# ls -l extr*
-rw------- 1 root root 131072000 Nov 28 14:16 extraSwap
[root@shree swap]# echo "setup and enable swap"
setup and enable swap
[root@shree swap]# mkswap extraSwap
Setting up swapspace version 1, size = 131067 kB
[root@shree swap]# swapon extraSwap
[root@shree swap]#
[root@shree swap]# echo "To Disable the swap use below"
To Disable the swap use below
[root@shree swap]# swapoff extraSwap
|
Kernel
Parameters:
Oracle
recommends that you set shared memory segment attributes as well as
semaphores to the following values.
If
not set, database instance creation will fail. I added the following
lines to /etc/sysctl.conf file. Every OS process needs
semaphore
where It waits on for the resources. For more on semaphore, please
read the UNIX os documents.
NOTE:
If the current value for any parameter is higher than the value
listed in this table, then do not change
the
value of that parameter.
To
see the current setting in the kernel, please use the below command.
-
/sbin/sysctl
-a | grep sem -- for semmsl,
semmns, semopm, semmni
/sbin/sysctl
-a | grep shm -- for shmall,
shmmax, shmmni
/sbin/sysctl
-a | grep file-max
/sbin/sysctl
-a | grep ip_local_port_range
/sbin/sysctl
-a | grep rmem_default
Please
add/change the appropriate variables value in the /etc/sysctl.conf
file as shown below.
-
|
net.ipv4.ip_forward
= 0
net.ipv4.conf.default.rp_filter = 1
net.ipv4.conf.default.accept_source_route = 0
kernel.sysrq = 0
kernel.core_uses_pid = 1
kernel.shmmax = 2147483648
kernel.sem = 250 32000 100 128
fs.file-max = 65536
net.ipv4.ip_local_port_range = 1024 65000
net.core.rmem_default = 262144
net.core.wmem_default = 262144
net.core.rmem_max = 262144
net.core.wmem_max = 262144
|
After
adding these lines to /etc/sysctl.conf, please run the below command
as root to make them enabled.
-
|
[root@shree
root]# sysctl -p
net.ipv4.ip_forward = 0
net.ipv4.conf.default.rp_filter = 1
net.ipv4.conf.default.accept_source_route = 0
kernel.sysrq = 0
kernel.core_uses_pid = 1
kernel.shmmax = 2147483648
kernel.sem = 250 32000 100 128
fs.file-max = 655360
net.ipv4.ip_local_port_range = 1024 65000
net.core.rmem_default = 262144
net.core.wmem_default = 262144
net.core.rmem_max = 262144
net.core.wmem_max = 262144
|
Creating
Oracle User Account:
You
need OS “oracle” user account created which owns the Oracle
software. Oracle Software installation
needs
to be proceeds by this account. Oracle software installation (without
Companion CD) requires 2.5 GB
of
free space available for the ORACLE_BASE directory. Please make sure
that the mount point where you
plan
to install Software has required free space available. You can use
“df –k” to check this out.
-
|
[root@shree
root]# df -k
Filesystem 1K-blocks Used Available Use% Mounted on
/dev/hda5 40662492 5345128 33251812 14% /
none 257884 0 257884 0% /dev/shm
/dev/hdb1 9621848 3344928 5788144 37% /backup
|
I
had about 33GB of free space available on “/” mount point. So I
decided to install Oracle under this
mount
point.
-
|
groupadd
dba
groupadd oinstall
useradd -g oinstall -G dba oracle
passwd
oracle
|
You
do not need oinstall group if you are not installing on the
production server or you (or your team) are the only person
responsible
for future installations/upgrades of Oracle Software.
Setting
Shell Limits for the Oracle User:
To
improve the performance of the software on Linux systems, you must
increase the following shell limits for the
oracle
user:
Add
the following lines to the /etc/security/limits.conf file:
oracle soft nproc 2047
oracle hard nproc 16384
oracle soft nofile 1024
oracle hard nofile 65536
Add
or edit the following line in the /etc/pam.d/login file, if it does
not already exist:
session required
/lib/security/pam_limits.so
For
the Bourne, Bash, or Korn shell, add the following lines to the
/etc/profile:
if
[ $USER = "oracle" ]; then
if
[ $SHELL = "/bin/ksh" ]; then
ulimit
-p 16384
ulimit
-n 65536
else
ulimit
-u 16384 -n 65536
fi
fi
For
the C shell (csh or tcsh), add the following lines to the
/etc/csh.login.
if
( $USER == "oracle" ) then
limit
maxproc 16384
limit
descriptors 65536
endif
Creating
Oracle Software Directories:
Asp
per OFA, oracle base directory has the path:
/mount_point/app/oracle_sw_owner
where
mount_point
is
the mount point directory for the file system that will contain the
Oracle software. I have used /u01
for the mount point
directory. However, you could choose another mount point directory,
such as /oracle
or /opt/oracle.
oracle_sw_owner
is the operating system user name of the Oracle software owner, for
example oracle.
-
|
[root@shree root]# mkdir -p
/u01/app/oracle
[root@shree root]#
chown oracle.oinstall /u01/app/oracle
[root@shree root]# mkdir -p /u02/oradata/db102
[root@shree root]# chown oracle.oinstall /u02/oradata/db102
[root@shree
root]# chmod -R 775 /u01/app/oracle
[root@shree
root]# chmod -R 775 /u02/oradata/db102
|
The
following are the storage options supported for storing Oracle
Database files and Oracle Database recovery files.
Oracle
Database files include data files, control files, redo log files, the
server parameter file, and the password file.
File
system
Automatic Storage Management
Raw devices
The
File System option is used here as a regular installation process.
Please
goto Configuring
ASM (Automatic Storage Management) Instance and Database to
create an ASM
Instance
and configure database to use ASM instance.
Please
goto Configuring
Raw Devices to
create database that use Raw Device.
NOTE:
Database files are supported on file systems, Automatic Storage
Management, and raw devices. Recovery files are supported only on
file systems and Automatic Storage Management.
Setup Oracle
User Account:
If
you have more than one Oracle software installed on the machine, then
you might want to create .bash_profile for each oracle home. For e.g,
I have two oracle software installed on my machine. I have created
.bash_profile9i for my 9i server and .bash_profile10g for my 10g
server. I leave .bash_profile to its default. If you are going to
install Only 10g, then no need to create extra .bash_profiles.
Add
the below lines into the .bash_profile file under /home/oracle. DO NOT
include the
ORACLE_HOME variable. We will add it once the software is installed.
-
|
export
ORACLE_BASE=/u01/app/oracle
export ORACEL_SID=db10
|
At
this point you are ready to start Installing Oracle 10g.
Obtaining Oracle
10g Software:
Goto
otn.oracle.com and download the appropriate Oracle 10g Software into
the /tmp. Make Sure You have enough space under this mount point. You
can check this using df command. I downloaded
0201_database_linux32.zip file
for my 32-bit Linux box. If you just want to create single instance
database, you do not need to download clusterware. Also You do not
need companion cd if you do not want to have HTML DB installed. This
file comes with a .zip extension which needs to be unzipped using the
unzip utility which is installed as part of CentOS. Incase you do not
have one; you can get it from here.
After Unzipping this file, you can optionally write them on the CD. I
generally prefer cdrecord command.
I
used a CD media of 700MB capacity and 10g (10.2.0.1) was copied
successfully.
-
|
[root@shree root]# unzip
/tmp/0201_database_linux32.zip
[root@shree root]# mkisofs -r /tmp/databases | cdrecord -v dev=1,1,0
speed=20 -
|
If
you are installing the software from disc, mount the first disc if it
is not already mounted. Some platforms automatically mount the disc
when you insert the disc into the drive. Wherever you store software,
you “cd” to that directory.
I
usually copy the software on the CD as mentioned above.
-
|
[root@shree
root]# xhost +
access control disabled, clients can connect from any host
[root@shree root]# mount /mnt/cdrom
[root@shree root]# su - oracle
[oracle@shree oracle]$ echo $ORACLE_BASE
/u01/app/oracle
[oracle@shree oracle]$ echo $ORACLE_SID
db102
[root@shree oracle]# /mnt/cdrom/runInstaller
|
Follow
the below procedure:
-
Main Screen:
Basic
Installation: Yes
Oracle Home
Location: Use default (/u01/app/oracle/product/10.2.0/db_1)
Installation
Type: Enterprise Edition (You can select accordingly)
UNIX DBA
Group: Use default: dba
Create Starter
Databases: I checked it for this example which is the default
Global
Database
Name: db102
Database
password: Type in the password for SYS, SYSTEM, SYSMAN, and
DBSNMP
accounts
Advanced
Installation: No
Click
Next
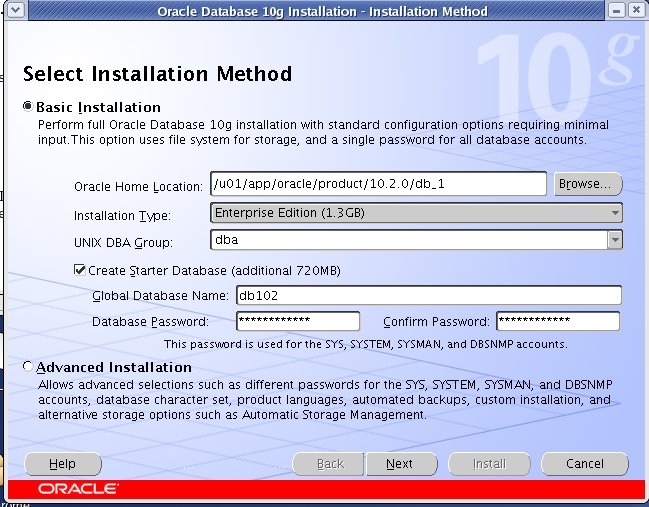
Click
Continue
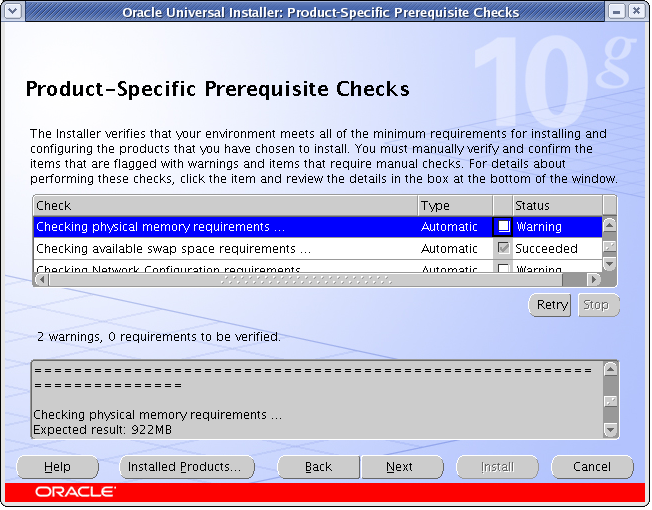
-
Product-specific Prerequisite Checks:
Verify
that all of the prerequisite checks succeed, then click Next.
Oracle
Universal Installer checks the system to verify that it is configured
correctly to run Oracle
software. If you have
completed all of the
preinstallation steps in this guide, all of the checks should pass.
If a check fails, then
review the cause of the failure listed for
that check on the screen. If possible,
rectify the problem
and rerun
the check. Alternatively, if you are satisfied that your system meets
the requirements,
then you can select the check box for the failed check to manually
verify the requirement.
Click
Next
-
Specify Database Schema
Passwords:
If
you select Advanced Installation, you will be prompted for the SYS,
SYSTEM, SYSMAN, and DBSNMP
passwords,
Oracle recommends that you specify passwords that:
-
Are at least four characters long
-
Are not the same as the user names
-
Have at least one alphabetic, one numeric, and one punctuation mark
character
-
Are not simple or obvious words, such as welcome, account, database,
or user
Note:
You
must remember the passwords that you specify.
Click
Next
Click
Install
Execute
the below script as a root when asked:
/u01/app/oracle/product/10.2.0/db_1/root.sh
Click
OK
End of Installation:
Exit
Creating
Backup of the root.sh:
Oracle
recommends that you back up the root.sh
script after you complete an installation. If you install other
products in the same Oracle home directory, then Oracle Universal
Installer updates the contents of the existing root.sh
script during the installation. If you require information contained
in the original root.sh
script, then you can recover it from the backed up root.sh
file.
Configuring
New or Upgraded Databases:
Oracle
recommends that you run the utlrp.sql
script after creating or upgrading a database to recompile all PL/SQL
modules that might be in an invalid state, including packages,
procedures, and types. This is an optional step but Oracle recommends
that you do it during installation and not at a
later date.
Updating
.bash_profile:
Now
.bash_profile needs to be updated with the value of ORACEL_HOME, path
and LD_LIBRARY_PATH.
export
ORACLE_HOME=$ORACLE_BASE/oracle/product/10.2.0/db_1
export
PATH=$PATH:$ORACLE_HOME/bin
export
LD_LIBRARY_PATH=$ORACLE_HOME/lib
REFERENCES:
Oracle
Documentation